Increase Warehouse Efficiency Using Dynamics NAV: Maximize Storage Density

Maximizing storage density may not have the most immediate impact on costs, but if you have not maximized your storage density, then the chances of needing to move to a larger facility, or renting space at an outside warehouse will eventually be an issue for you. Many times the cost to maximize your storage density is cheaper than moving or renting outside space. Keep in mind, moving to a new building, or business being so good that you need to rent outside space is not necessarily a bad thing! I mean if business is booming, then you need to do what you need to do. The point of focusing on this critical concept is that you want to make sure you avoid those additional costs until you have to.
So what do I mean when I use the terms Maximize Storage Density? Storage density is defined as the percentage of available space that is filled with product. Now let’s be clear the goal is not to buy so much inventory that you fill your available space. In fact, it is the opposite, the goal is to use as little space as possible to hold just enough inventory to meet your order fulfillment goals. This blog is focused on warehousing logistics, so I will not spend time in this blog discussing planning strategies.
Measuring Density
When we measure density, we are measuring the percent of the warehouse storage space that is filled with product. This is a tricky measurement because if you have excess warehouse storage capacity, then you don’t want to include the excess area in your calculation. Having excess storage capacity is a good thing, but you shouldn’t allow it to hide poor warehouse practices. Humans have the propensity to consume all time, space and money available. Just because you have it, doesn’t mean you have to use it. Remember, one of our efficiency goals is to minimize travel time. If you spread product out when you don’t need to, then you are increasing travel time in either your pick or replenishment processing. So the density measurement should be based on how densely you are using the space that is holding product. This means you will want to deduct from your available space the portion that is not actively holding product.
Density measuring calculates how effectively you are using the cubage space of your warehouse, meaning the length, width, and height of your warehouse. As an example, let’s assume the storage area of your warehouse has the dimensions of 100 feet long, by 100 feet wide, and 15 feet tall. Your warehouse therefore has 150,000 (100 *100 *15) cubic feet of storage.
Now imagine that this space had no storage capabilities other than stacking the product on the floor. If you now measure the square feet that your pallet storage take ups (excluding the aisles), then your space utilized is the storage square feet times the average height of your pallet.
Let’s use an example assuming that your warehouse has three aisles that are 10-feet wide. That means 3,000 square feet must be deducted from our total square footage because that is our aisle space. The balance, or 7,000 square feet is storage (remember that we had filled all the floor space with pallets of product except for the aisles). Let’s also assume that the average pallet height is 5 feet high. The cubage space that we have consumed is 35,000 cubic feet (7,000 square feet at a height of 5 feet). In our example, we have used only 23% of our available storage space (35,000/150,000).
Ways to Better Utilize Warehouse Space
Utilize Vertical Space
The obvious solution is to take advantage of the height of the warehouse. Installing pallet racking will increase the ability to store product vertically. There is more to consider though; pallet racking will allow vertical usage, but be careful about over-estimating how much it will densify your storage. The assumption is that you can triple your density by adding three shelf pallet racking. This assumption is not accurate; here are some reasons why:
- Lift trucks require wider aisles so you will lose floor space there.
- Long narrow aisles limit how many people can be picking in an aisle, so you will likely need to add crossing aisles. This too will reduce floor space.
- Each shelf must allow space for the beam and clearance (top and on both sides), so by definition this becomes dead space.
- You must allow for fire codes and sprinklers so even though your building is 15-feet tall, you may not have 15-feet of storage capacity.
- Finally, if your pallet is 5-feet high, you will not be able to stack three shelves high, because the sum of the pallets, shelving beam, and clearance will be taller than 15 feet.
This does not suggest that pallet racking is not a good solution, it is just is a reminder that as Newton said, for every action, there is an equal and opposite reaction.
So what can you do to densify your storage in this example?
- Consider stacking your pallets two or three levels high if your product allows.
- Install pallet racking, but make sure to evaluate all options such as:
- Flow racking
- Push back racking
- Narrow aisle lift trucks
- Modifying your pallet configuration so that your pallets are shorter in height allowing more levels in your racking
- Considering mezzanine racking that would basically provide two levels of storage
- Considering shelving units on the first level with pallet racking over the shelving units
The point is, there are so many things to consider when trying to densify storage, and as I always say the “Best Practice” solution is unique to your warehouse. Don’t let current parameters lock you into a bad decision. Maybe my pallets can be four layers rather than five. That will allow me to use three shelf pallet racking rather than just two shelves. Yes, push back racking is much more expensive to purchase than a standard simple pallet rack, but, if that push back rack provides a significant gain in densification, it may well be worth it. When compared to renting off site space, paying to move it to and from the offsite storage, it may not look so bad after all.
Utilizing vertical storage space suggests a need to create bin identification so that the product can be found where it is stored. Unlike the process of lining up the product on the floor, you now need to be able to find the product wherever it has been placed.
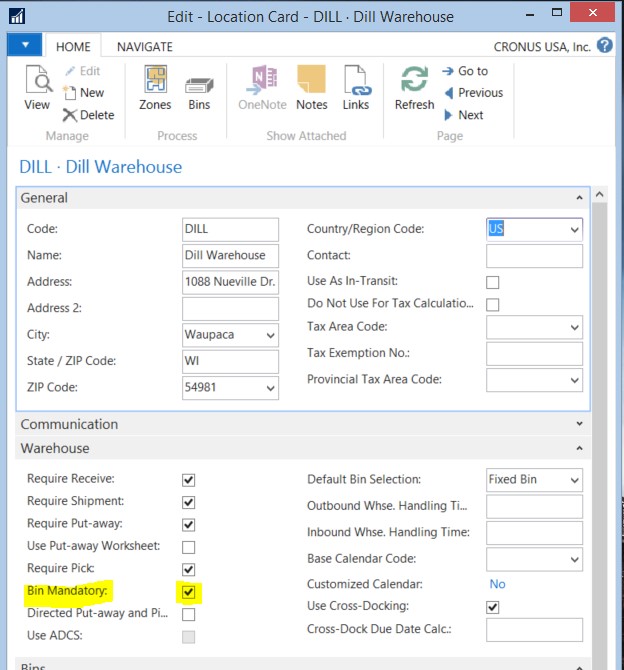
This can be done by turning on the “bin” logic in NAV. This will require that every transaction references a bin so that the bin information is always correct. The first thing to do when turning on bin logic is to set the “Bin Mandatory” flag on the Location card.
Figure 1 – The “Bin Mandatory” checkbox on the Dynamics NAV location card
Once Bin Mandatory is turned on, NAV will require the user to reference a bin on every transaction that is processed. This will make sure you know where your product is in this more complicated warehouse configuration.
Combining Items in Bins
One of the common reasons that there is unused space in a warehouse is that a bin has only one item in it, but that item will never have enough inventory to fill that bin. When that happens, the bin is left partially filled, thus poor space utilization. The best way to maximize space in this scenario is to store multiple items in the same bin. This will allow you to densify the storage in that bin.
There is a downside to this in that now there are two items in the same bin, which means the warehouse staff needs to be more diligent during picking to make sure they pick the correct item. When we focus on picking accuracy we will talk about ways to mitigate the exposure of picking errors when products are combined in one bin.
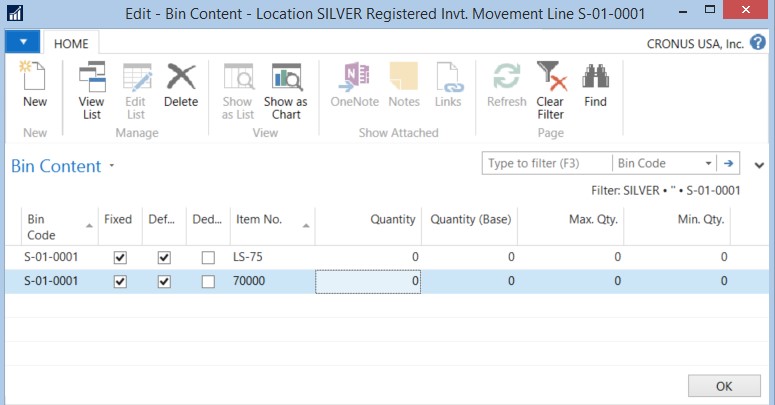
Dynamics NAV allows you to combine items in a bin. There is no special setup unless you are using the “Directed Pick and Put” functionality. You can create a bin content record if you like, but NAV will create a bin content record for the second item in that bin automatically when you process the Move, Receipt, Put-Away or Adjustment transaction. The screen shot below shows how to create bin contents manually for two items in the same bin:
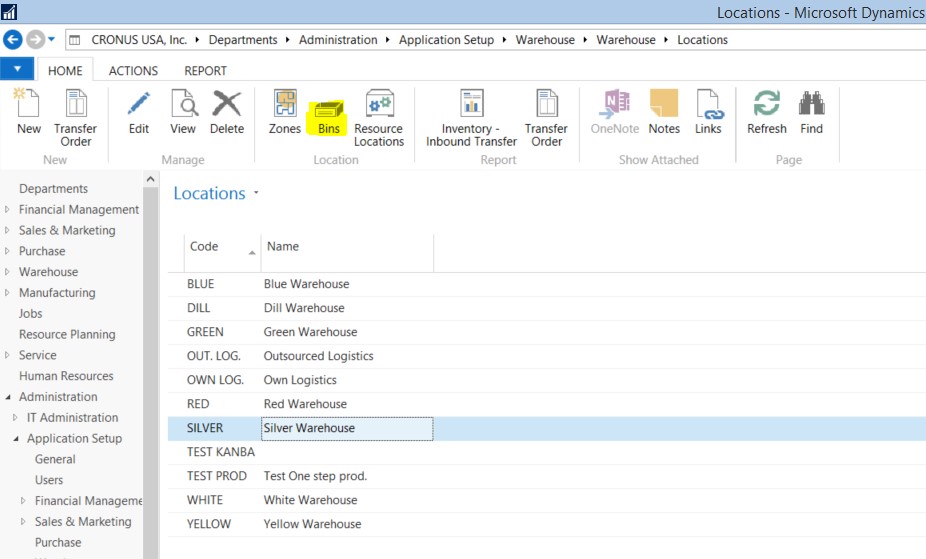
- Search or navigate to the Location List Page.
- Select the location by highlighting the Location code line.
- Click the Bins icon on the ribbon.
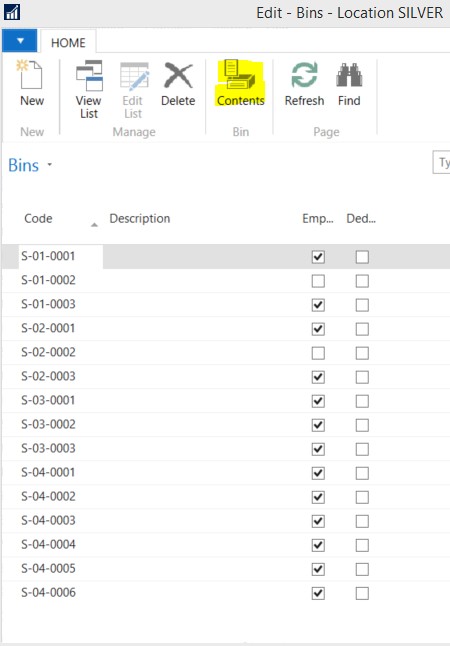
- The list of bins in this location is displayed.
- Select bin for which you would like to create the bin contents records.
- Click the Bin Contents Icon.
- The list of In Contents records for this item is displayed.
- As you can see from the screen shot below, you can create records for multiple items in the same bin.
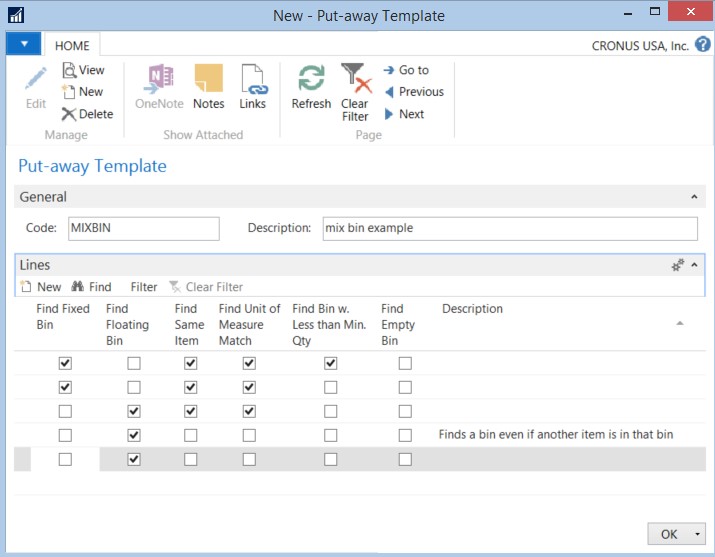
If you want Directed Pick and Put to suggest combining products in a bin, then you will need to create put-away rules to do so. To create the rules for Put-away suggestions, you will need to update the Put-Away Template that is used for items that you would want to combine. The example below shows the kind of rule you might setup for this type of item:
The put-away template tells NAV the logic it should follow to make the suggestion. NAV reads through the list of rules in the template and uses the first valid rule to make the suggestion. It continues through the rules top to bottom until it finds a rule that works. The example above would work as follows:
- The first rule looks for bin content records that:
- Have been set as “Fixed”, meaning that the bin does not get deleted when its balance falls to zero.
- The Item has been assigned to that fixed bin.
- The unit of measure of the bin contents record matches the unit of measure of the quantity being put away.
- Have less inventory then the minimum amount that has been set for this bin content.
- The second rule looks for bin content records that:
- Have been set as “Fixed”, meaning that the bin content record does not get deleted when its balance falls to zero,
- The Item has been assigned to that fixed bin
- The unit of measure of the bin content record matches the unit of measure of the quantity being put away.
- Has less inventory then the maximum amount, weight or cube that has been set for this bin.
- The third rule looks for bin content records that:
- Have not been permanently assigned for this item.
- There is inventory of this item in that bin already
- The unit of measure of the bin content record matches the unit of measure of the quantity being put away.
- Has less inventory then the maximum amount, weight or cube that has been set for this bin.
- The third rule looks for bin content records that:
- Do not have this item stored in it as of yet
- Has less inventory then the maximum weight or cube that has been set for this bin.
You can see that fourth rule only cares if there is room in this bin. If there is room in this bin, then it will use the bin priority rule and combine products in this bin as the two conditions are met.
As you can see, there is a great deal of planning that must go into densifying your storage. This blog only scratches the surface of things to look at and consider. Remember, there is no best practice that applies to all warehouses. Also remember that almost every option you consider could have a detrimental effect on something else. Regardless of your specific requirements, Dynamics NAV can help you densify your storage.
Read the first blog in this series for more on optimizing your warehouse system. And for any questions about how you can use Microsoft Dynamics NAV to help improve your overall efficiency, please contact one of our Dynamics NAV experts today.

