NAV 2016: How to Set Up and Use the Positive Pay Feature

Microsoft Dynamics NAV has introduced a new feature in NAV 2016 to help you reduce fraudulent transactions with your bank. This feature is called Positive Pay. In my opinion, it should be called Positively Positive-Positive Pay, as it is both easy to use and can help protect your organization.
Setting up Positive Pay and using it is a relatively easy process. This blog touches on some of the high points of the setup and use of the feature.
Understanding your bank’s requirements
The first step in setting up a Positive Pay feature is to understand your bank’s requirements. Your bank should be helpful in sharing their requirements and explaining the functionality. I also recommend inquiring about the benefits of using Positive Pay. Also be aware that there may be additional fees for using Positive Pay.
Setting up NAV for Positive Pay
Setting up NAV for Positive Pay is relatively easy. You basically decide the format of the files that will be transmitted, assign fields in the files, define the flow of information, and the assign the format to the bank account.
Define the format of the files
NOTE: NAV 2016 comes with two major bank’s file formats predefined. These are Bank of America and Citibank.
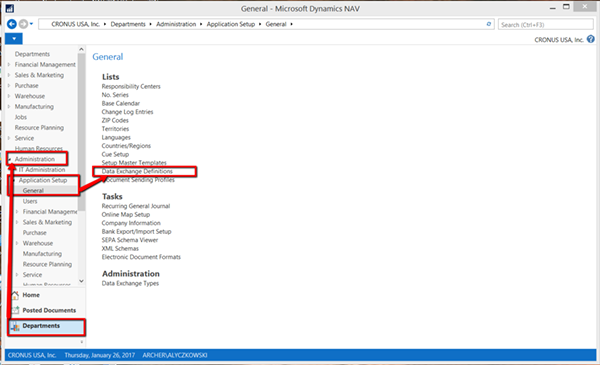
Setting up the format is performed from the Departments/Administration/Application Setup/General menu. From this menu, select Data Exchange Definitions.
Figure 1. Navigating to Data Exchange Definitions.
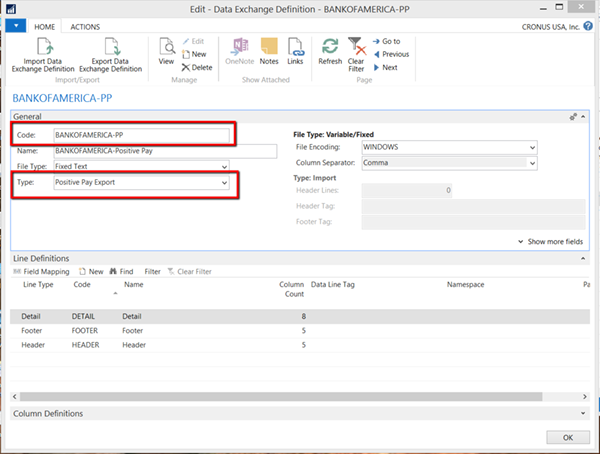
From the list, select the definition that you want to edit, or select New to create a new definition. Verify that the type of data exchange is defined as Type = “Positive Pay Export.”
Figure 2. Creating or editing the definition.
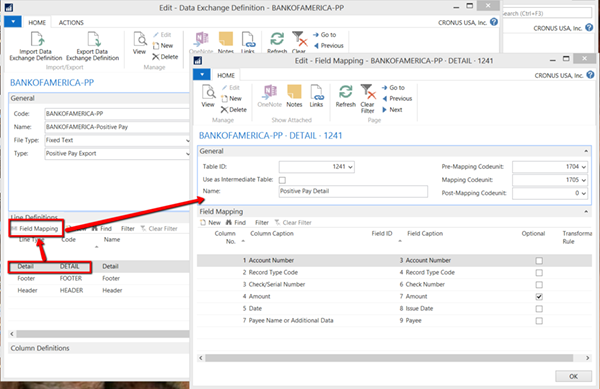
After determining the format of the files generated, you can determine and assign the field that your bank requires. This is performed from the Line Definitions in the Data Exchange Definition page. Select Field Mappings for the portion of the file that you wish to map field to.
Figure 3. Determining and assigning bank-required fields.
Define the flow of information
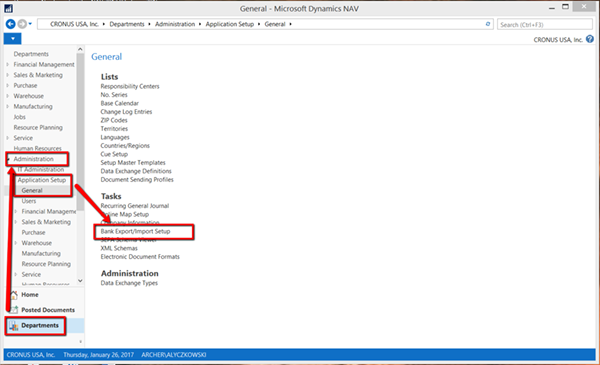
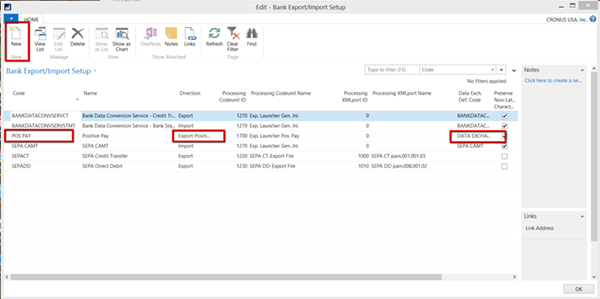
After determining the format and information that will be contained in the Positive Pay files, you need define the flow of information. This is defined in the Bank Export/Import Setup screen. From the Departments/Administration/Application Setup/General, select Bank Export/Import Setup.
Figure 4. Defining the flow of information.
Hit the New button to insert a New Record. Define a Code, Name, Direction, and Data Exchange Default Code.
Figure 5. Inserting a New Record.
Associate an export format to bank account
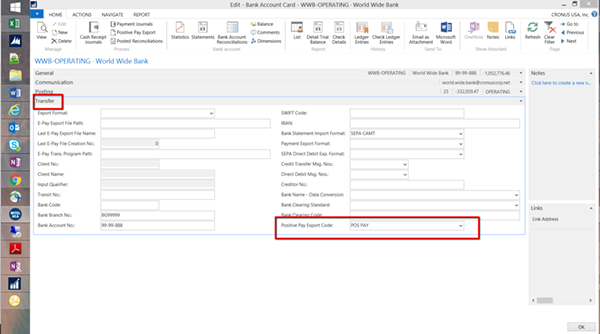
After defining the data, you will need to associate an export format to the bank account. On the bank account from which you will be exporting Positive Pay, define the Positive Pay Export Code, located on the Transfer FastTab.
Figure 6. Define the Positive Pay Export Code, located on the Transfer FastTab.
Using Positively Positive-Positive Pay
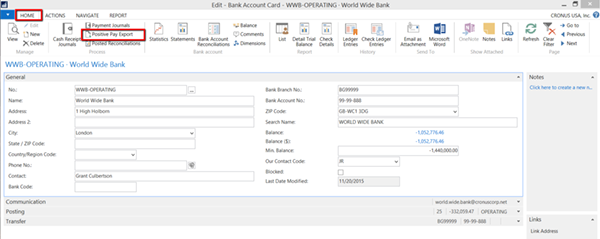
After performing the setup above, you can start using this great tool. To use it, you need to print some checks. After printing checks, open the Bank Account card and select Positive Pay Export.
Figure 7. Bank Account card, Positive Pay Export.
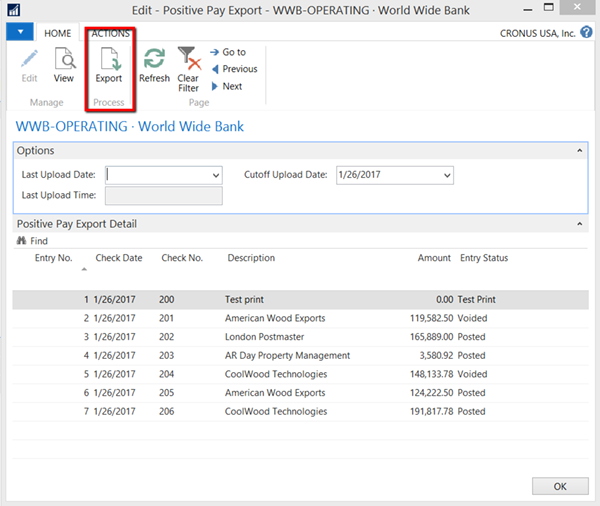
The Positive Pay export page will indicate the last date you uploaded payments and the details of the payments that have not been transmitted. Hit the Export Button to create the file.
Figure 8. Exporting a file.
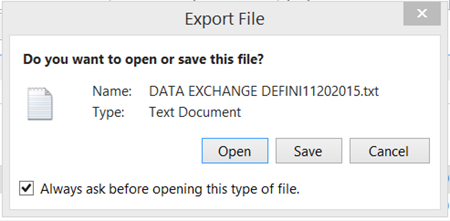
When the file is generated, you will be notified. Save the file and transmit to your bank according to their requirements.
Figure 9. Saving the file to transmit to your bank.
Additional features in NAV 2016 Positive Pay
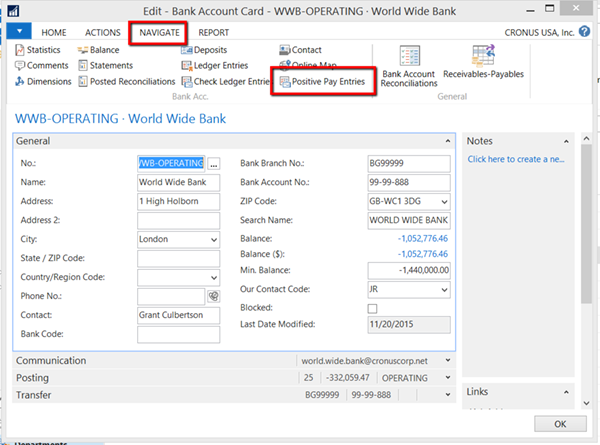
After transmitting the Positive Pay, you can review or re-transmit previously submitted files. This can be performed from the Bank Account card.
Figure 10. Viewing Positive Pay entries.
From the Positive Pay Entries page, you can regenerate the export file, record a Confirmation Number from the bank, and even look at the details from the entry.
Figure 11. Re-exporting Positive Pay to a file.
The setup and use on NAV Positive pay is easy to perform. The benefits of reducing fraud on your bank accounts are great. Using the tool is even easier. That is why I think that this feature should be renamed Dynamics NAV 2016 – Positively Positive-Positive Pay.
If you have questions about this or other new features in Microsoft Dynamics NAV 2016, contact the experts at ArcherPoint.
For more step-by-step instructions on how to perform specific tasks in Microsoft Dynamics NAV, browse ArcherPoint’s collection of How-To blogs.

