Dynamics NAV Role Tailored Client - Add a Factbox in a Document Page

(Applies to NAV 2013, NAV 2013 R2, NAV 2015 and NAV 2016)
Suppose we want an Item Image to be displayed in the Sales Order When Selected in Sales Order Sub form.
Let’s create a FactBox for displaying the item Image that we will attach to the Sales Order Page.
For this demo I am Using NAV 2016 and Page No. 50000 using the Page Properties below:
| Page Property | Value |
|---|---|
| Page No. | 50000 |
| Page Name | Item Image FactBox |
| Page Type | CardPart |
| Source Table | Sales Line |
Table 1 – Page Properties.
The Page has one Global Variable of Table Item, as shown below:
Figure 1 – Global Variables.
The Page Designer is shown below:
Figure 2 – Page Designer.
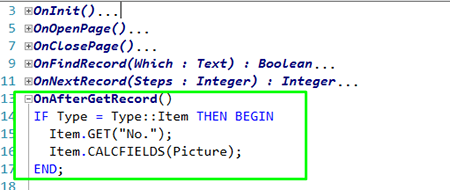
There is a line of code that we write to get the Item Image:
Figure 3 – C/AL Code to get Item Image.
Now let’s add the FactBox in the Sales Order Page:
- Design Page 42.
- Navigate to Last Page Group that is FactBox Area.
- Insert a New Line and of Type Part using the Properties below in the same order.
| Property Name | Property Value |
|---|---|
| PartType | Page |
| PagePartID | Item Image FactBox |
| ProviderID | 58 |
| SubPageLink | Document Type=FIELD(Document Type),Document No.=FIELD(Document No.),Line No.=FIELD(Line No.) |
Table 2 – FactBox Properties.
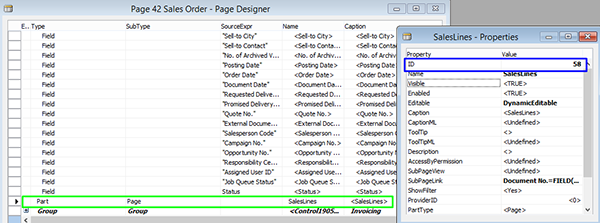
** ProviderID is not static to 58. Actually, the ProviderID is linked to Factbox to the Sales Line Part.
** To get the Actual ProviderID, you need to see the ID of SalesLines Part, as shown below.
Figure 4 – Provider ID for Sales Line Part.
Run the Sales Order page and add an Item in the Sales Line that has Item Picture.
Figure 5 – Sales Order Page with Item Image Factbox.
If you have any questions about this function or other Dynamics NAV questions for any version, contact ArcherPoint.
Read more “How To” blogs from ArcherPoint for practical advice on using Microsoft Dynamics NAV.
If you are interested in NAV development, check out our collection of NAV Development Blogs.


