Microsoft Dynamics NAV 2016 1099 Tax Form Preparation

Prepare Early
Although the end of the year may still seem far away, starting your preparations now will ensure you are prepared and have time to tackle any challenges you may encounter. As part of that preparation, it is a good idea to review your 1099 reports and settings in Microsoft Dynamics NAV: 1099s should be issued before the end of January annually after your year-end close.
Microsoft Dynamics NAV makes issuing 1099s easy, especially if you have prepared and used the tools available in NAV during the year. I recommend setting a calendar reminder for yourself to remember to double check 1099 information in NAV in the 3rd quarter annually so that you have plenty of time to correct any errors you may find.
Setting up Vendor 1099 Information
How do you set up Vendor 1099 information in NAV? It’s simple, in order for 1099s to print correctly in NAV, the Vendor card must have the 1099 Code box set to MISC-## (or INT-## or other applicable code depending on your transactions with the Vendor). If the code MISC or INT is alone without the numbers, then the 1099 information will not pull to the reports as these are placeholders for the categories.
When you setup a new Vendor, on the Vendor Card, you can find the IRS 1099 Code box in the Payments section. Make sure to fill in the Vendor’s Federal ID Number along with selecting the appropriate IRS 1099 Code. If you ensure this information is entered when you enter a new Vendor in NAV then NAV will automatically check the 1099 Liable box on all Purchase Invoices for this Vendor. This setup guarantees that all of the appropriate transactions for this Vendor will pull to the 1099 Report in NAV.
Figure 1 – Dynamics NAV 2016 Vendor Card – Payments
What if the IRS 1099 Code didn’t get filled in when the Vendor was setup and you’ve already entered Purchase Invoices and Payments? The solution is easy: first, confirm that you have a W-9 from the Vendor and then, as with the initial setup, go into the Vendor card and select the appropriate IRS 1099 Code and enter the Federal ID number. This will make certain future transactions are coded correctly for the 1099 report.
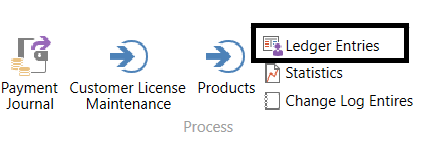
Now you must fix the historical transactions that occurred before the correction you just made. To access the transactions for the Vendor that you just added the IRS 1099 Code to, you can either highlight the Vendor in the Vendor List in NAV and press Ctrl and F7 to bring up the Vendor Ledgers Entries or you can highlight the Vendor in the Vendor List and then select the Ledger Entries button near the top of the NAV window.
Figure 2 – NAV 2016 – Accessing Vendor Ledger Entries
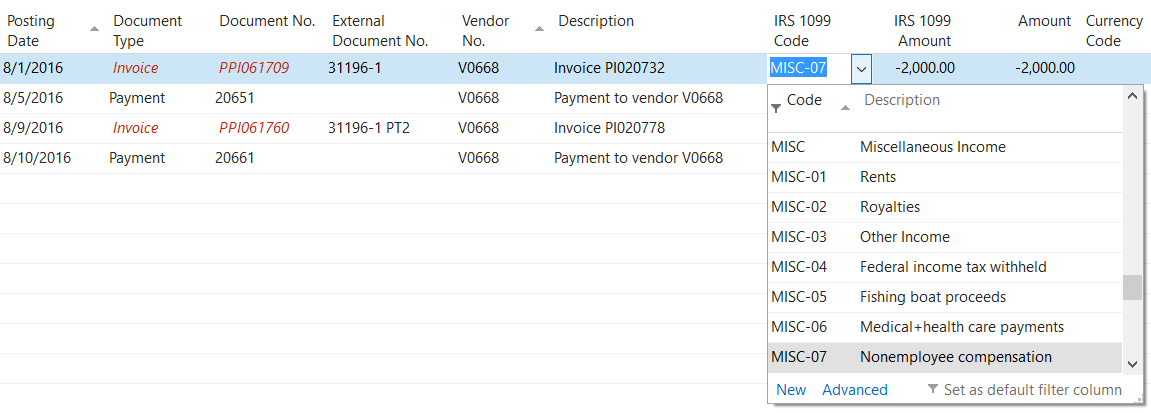
In the Ledger Entries for each Invoice, use the IRS 1099 Code drop down to select the correct code and then enter the amount of the Invoice (or the amount that is 1099 applicable on the Invoice) into the IRS 1099 Amount box. Do this for each Invoice line in the current year. For each Payment line in the current year use the drop down box to select the correct IRS 1099 Code only, do not fill in an INR 1099 Amount. Once all of the Invoice and Payment lines have been updated, then click OK to complete your changes. Now the vendor will print on the 1099 report with the correct amounts.
Figure 3 – Dynamics NAV 2016 Coding Vendor Invoices and Payments to IRS 1099 Code
Ensuring Accuracy
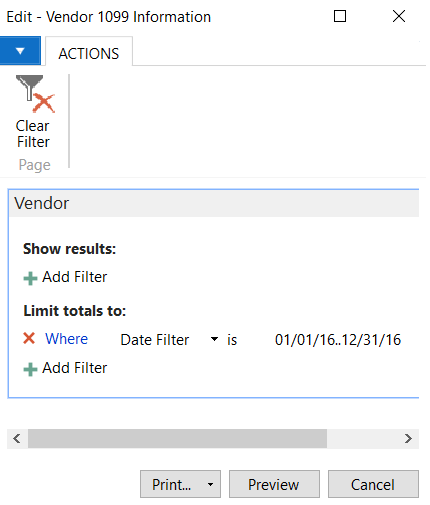
How will you know if the 1099 report is accurate or if you have errors that need correcting? You can run the Vendor 1099 Information Report in Dynamics NAV to see all of the 1099 information and amounts for each Vendor that is setup. To run this report in NAV 2016, type into the search bar “Vendor 1099 Information”. Under the Limit Totals to filter, select Date Filter and enter the current year start and end dates. Take this report and compare it to your Vendor list to make sure all 1099 eligible Vendors are showing up on the report. If a Vendor is eligible for a 1099, but does not show on this report, then check the Vendor setup and Ledger Entries and correct them as needed. If you are concerned about the accuracy of the total amount showing up for a Vendor on the report, then you can compare it with the Vendor Ledger Entries to find an Invoice that may not have had the IRS 1099 Code entered.
Figure 4 – Run the Vendor 1099 Information Report
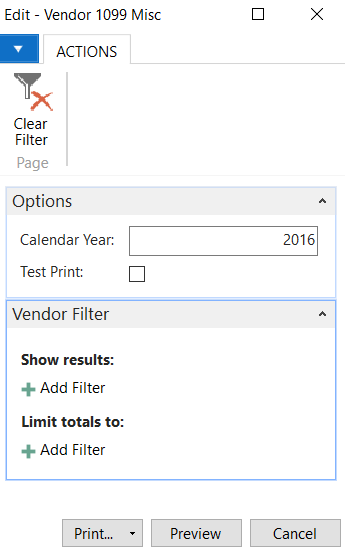
If everything on your Vendor 1099 Information report is correct, then you are ready to print the final 1099 forms to send to your Vendors. In NAV, in the search box, type Vendor 1099 Misc for the Miscellaneous forms, type Vendor 1099 Int for the Interest forms, and type Vendor 1099 Div for the Dividend forms. Then, enter the Calendar Year of the forms you wish to print and click to Print or Preview. If you load the correct forms into your printer, NAV will print the information in the correct boxes for you. You will then have nicely printed and formatted 1099 forms ready to mail to your vendors.
Figure 5 – Print Vendor 1099 Forms in Dynamics NAV 2016
Microsoft Dynamics NAV 2016 makes setting up, correcting, and printing annual 1099s simple.
Using older versions of NAV?
Please note, if you are running NAV 2013 through 2015 or have upgraded from a pre-2013R2 version of NAV there is a known bug in the 1099 reporting that could cause your reports to show incorrect amounts. If you suspect an error in the amounts of your 1099s reports, you can reach out to our team here at ArcherPoint for a solution or check out the blog post by Jon Long detailing the workaround.
For further reading on general 1099 regulations, please refer to the IRS website for guides on which types of 1099s to use and when.
Read Greg Kaupp’s blog for an interesting look at the benefits of salaried consultants versus using 1099 independent contractors.


