Create a Test Company in Microsoft Dynamics NAV

There are some very good reasons why you would want to have a test company setup for Dynamics NAV, including new employee training, exploring process changes, or before adding new, or updating existing, functionality. Having a test company allows you to examine the cause and effect of making changes to your master data (customers, items, vendors, etc.) without impacting your production data.
When creating a test company for Dynamics NAV, you need to make a couple of decisions first.
- Where will it reside? Will the testing company be in the production database or in a test database? Either way, it is good practice to create and update your test company monthly.
- How will you copy your production data into the test company?
In this blog, we will create a test company and explore the options for the best location to place the test company. Let’s first walk through the differences between the options. These instructions are for Microsoft Dynamics NAV 2017.
Deciding Where to Setup the Testing Environment
When you think about how you want to setup your testing environment, you have two main choices: creating the test company in the production database or in a test database. The best practice is to create the test company in a test database. The main reason is to allow you to test different development changes and not affect your production environment. If you determine you don’t want to have changes or new development, ask yourself the following questions to help facilitate your decision on where to place the test company:
- What will be easier for users to open and use?
- What will be easier for users to determine which company they are in?
- What is easier for the department that needs to create the test company?
- How long does it take to create?
Based on your answers, you will be able to make a decision on the best location for your test company. If in doubt, go with the decision of creating a test database where you can put the test company.
Making a Copy of Production Data
The next step is to make a copy of your production data. There are several ways to create the environment:
- Backup your Database and Restore the Database in Test Environment
Make sure you understand the process first so that your production database is not accidentally changed.
- Export Production Data and Import into Test Company
Do the objects/development customizations match between the two systems? If they do, follow the steps below. If they don’t match, you will need to get them in sync before you start.
- Copy the Production Company
- Open the NAV production database
- Search “Companies”
- Place your cursor on the line of the company you want to copy
- In the ribbon select copy
- Fill in the test company name
- Once the process is complete, you will see the test company on the list
For option 2 above, export your production data into a test company, follow these steps:
Figure 1 – Database Search
- From the list, select “Export to a data file”
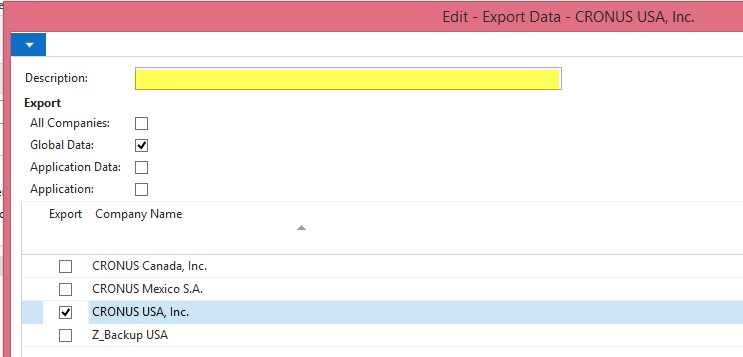
- Check which companies you want to export
- Fill in the Description
- Select which companies you would like to sync between test and production and pick the smallest company, so sync doesn’t take too much time
Figure 2 – Export Data Field - Select OK
- Save the file
- Open Test while the data is exporting
- Search Companies, You have two options
- Delete the company you want to replace
- Rename the company to a – old
- When the export is done, from the test database
- Search “Import from”
Figure 3 – Import Data Field - Find where you saved the exported data
- Select OK
- After the import, you will want to verify the data came in and you have no issues.
Knowing how to create a test company in Dynamics NAV will give you a tool to grow and expand the use of the system.
If you would like to learn more about creating a test company, contact ArcherPoint.
Read more “How To” blogs from ArcherPoint for practical advice on using Microsoft Dynamics NAV.
Trending Posts
Stay Informed
Choose Your Preferences
"*required" indicates required fields


