
Using Automated Intercompany Transactions in Microsoft Dynamics 365 Business Central
Intercompany functionality in Dynamics 365 Business Central reduces duplicate entries, data entry errors, and inconsistencies. It can also speed up consolidation by suggesting elimination entries based on transactions between two intercompany partner subsidiaries. This blog discusses automated intercompany transactions in Business Central and shows how to use them.
When Intercompany functionality is set up in Business Central, there are two ways transactions between companies in the same database can interact with one another:
- The first uses Intercompany Inboxes and Outboxes, where a user manually reviews incoming transactions for sales, purchases, and journal entries and chooses which to accept and reject.
- The second is by selecting which entities to automatically accept those transactions from, which means the related sales documents, purchase documents, and journal entries will be created in the other company automatically. This assumes the related entity will always accept these documents and is very common when the same users are processing related documents. It removes the step of accepting the documents through the inbox/outbox.
In both cases, documents must still be processed as usual. Intercompany functionality will not automatically post shipments, receipts, invoices, or journals in the related company, and it will not circumvent approval processes or security you have set up.
If you have used Dynamics NAV, the predecessor to Business Central, most of the setup and steps will look familiar to you. However, there have been several changes and additions to the workflow and functionality to help make the intercompany transaction process faster and more seamless.
This blog demonstrates how to set up another company as an Intercompany Partner in a database.
Enabling new features
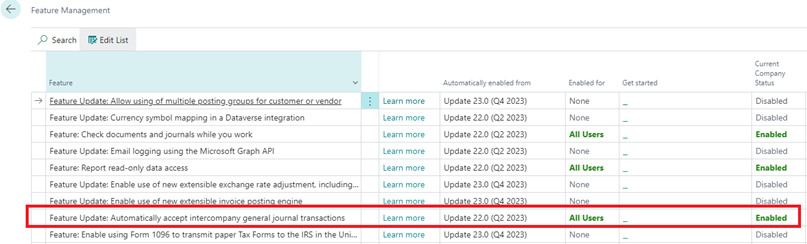
Accepting intercompany documents automatically is a feature that currently must be enabled for Business Central. Do not enable this feature if you have upgraded to Business Central from NAV or prefer to use the Inbox/Outbox to review manually and approve incoming or outgoing documents. The inbox/outbox process is discussed more below. You can also decide which trading partners you automatically accept documents from – if you want to accept them from any trading partner automatically, you must enable this feature globally.
Search and navigate to the Feature Management screen. Find the entry for “Automatically accept intercompany general journal transactions.”
Setting up the intercompany chart of accounts and dimensions
An intercompany chart of accounts is required to process intercompany transactions.
- From Search, navigate to the Intercompany Chart of Accounts page. This, as well as Intercompany Dimensions, can also be accessed from the Intercompany Setup page.
- If the accounts from each company are the same, you can quickly manage this task by going to Process in the action ribbon and selecting Copy from Chart of Accounts, then Map to Acc with Same No. The lines you want to use this function must be selected first; if you want to copy the accounts for all lines, select them with CTRL+A first.
Note: If your intercompany chart of accounts is not the same, you can upload it using a Configuration Package or the Open in Excel feature.

If your intercompany chart of accounts is different from this company’s, the No. field is an inbound G/L account, which will be sent to the G/L account in the company specified in the Map-to G/L Acc. No. field. During your first transactions using intercompany, we highly recommend running pre-posting validation reports to ensure setup was done properly, especially if these charts differ.
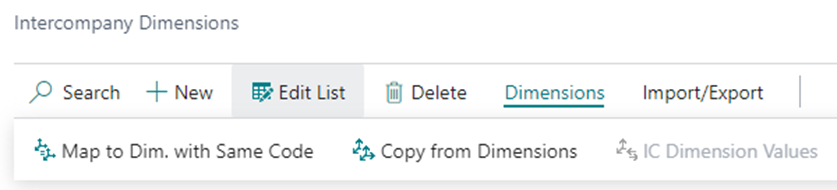
- Next, if you want to set up and map dimensions for your intercompany transactions, use Search to navigate to the Intercompany Dimensions page. Similar functions exist here for copying and mapping existing dimensions from the current company to the setup.
This will also copy the Intercompany Dimension Values. If you want to view or edit those values or the value code they map to, select a dimension line and go to Dimensions > IC Dimension Values.
Creating intercompany setups
The following is used to send intercompany transactions automatically without storing intercompany outbox transactions:
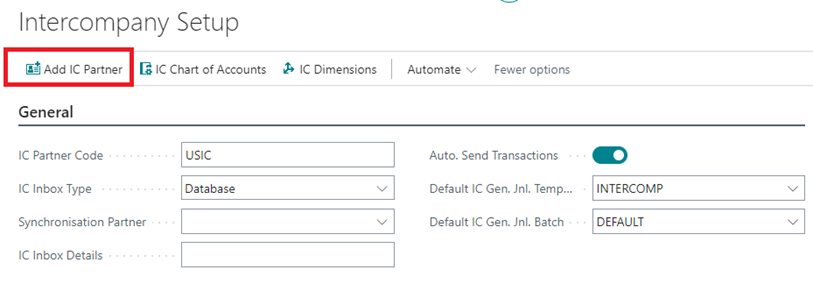
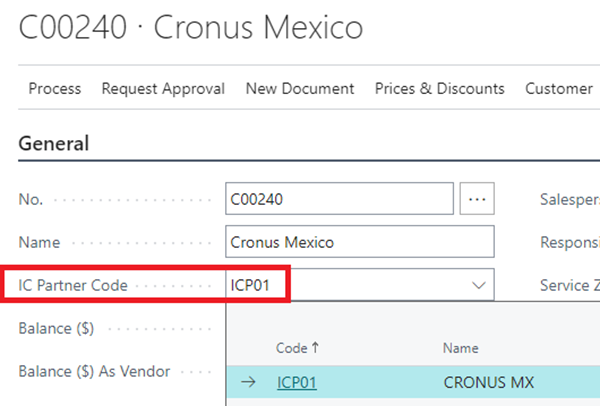
- Navigate to IntercompanySetup and enter an IC Partner Code. Note this code will be used when assigning setups for intercompany transactions in the other companies, so it is advised to use a code that is recognizable across your organization.
- If the company comes from the same database, keep the Inbox Type as Database. Set your Default IC Gen. Journal template and batch that were set up in the step above. Set Auto. Send Transactions if you want them to skip the Outbox processing step.
- Repeat this process in the other companies you want to trade with. For our example, below is a setup in Cronus Mexico.
- Next, add the Intercompany Partner(s) you want to trade with by using the Add IC Partner button.
From this screen, select the IC partner company. The code will copy over from the other company’s setup as explained above. It is highly recommended you keep this code the same. Set up any additional options, such as Country and Currency codes.
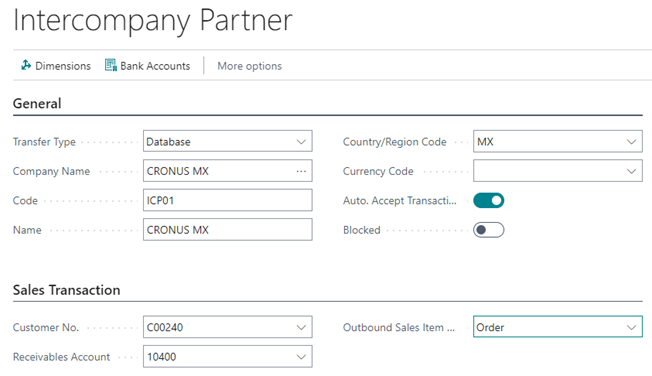
Then, add the related Customer and Vendor records. Note that you must first create this record, then the IC Partner Code will be available to assign on the Customer and/or Vendor record(s).
After this code is assigned on the related customer/vendor card, it can be selected on the Intercompany Partner record as shown below. Make note of the Outbound Sales Item No. Type field, which determines how item numbers are identified between companies.
Notes:
- Microsoft recommends that the General section of the Intercompany Setup be filled out for each intercompany partner before you add those partners and complete the additional steps below if the companies are in the same tenant.
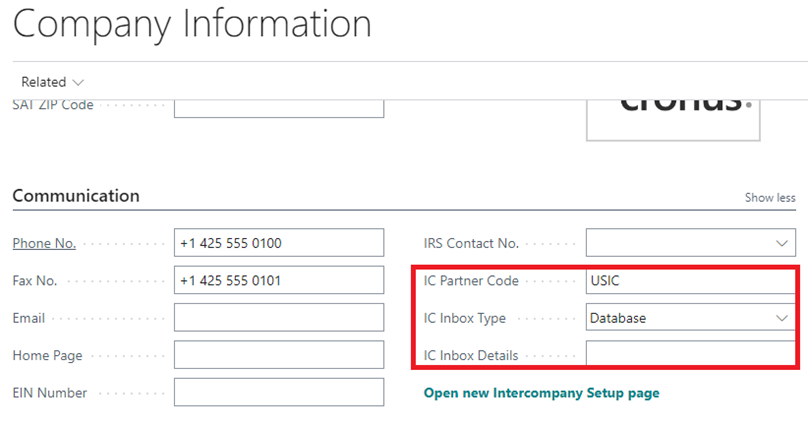
- For cloud deployments where you wish to import files from outside companies, you do not fill out the IC Inbox Details. Files must be manually imported and exported since BC SaaS cannot access a desktop or network location.
- Navigate to your Company Information page, under the Communication Fast Tab, and verify that your IC Partner Code and IC Inbox Type are set as the defaults you want them at.
Creating and posting transactions
You’re now ready to carry out transactions with your intercompany partners. When you post transactions with the related customer or vendor, your transaction will automatically be sent to the partner company if you have enabled Auto Send. If you decided against automatically sending records, you will see the transactions in the Intercompany Outbox Transactions page to review and send.
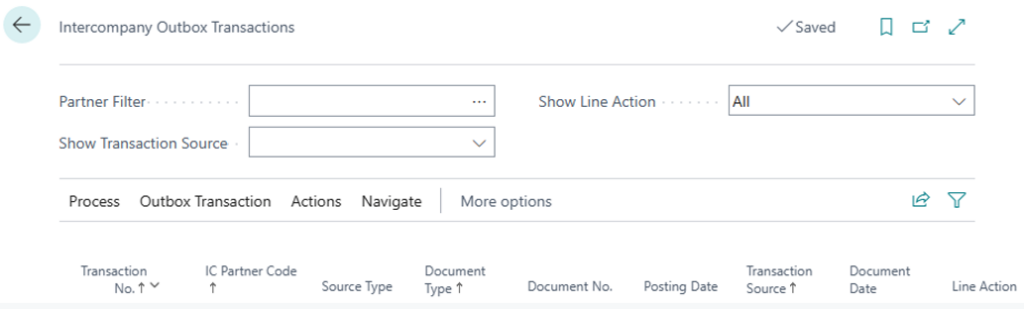
After sending, you can find the transactions in the partner company’s corresponding document or journal (e.g., if you sent a sales order, it will be turned into a corresponding purchase order). If the partner does not have Auto Accept Transactions enabled for your corresponding partner code, then the transactions will be available to review, accept, or reject in the Intercompany Inbox Transactions screen.
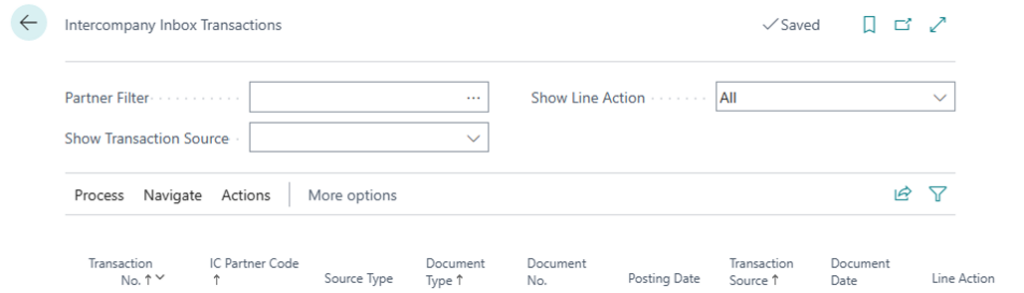
Figure 9 – Intercompany Inbox Transactions
Make sure you’re up to date!
Automating intercompany transactions is another time-saving reason to consider an upgrade from Microsoft Dynamics NAV to Business Central. For a free upgrade estimate, request our upgrade estimate worksheet so that you can budget for your next upgrade.
For more information on this or other Microsoft Dynamics Business Central topics, please contact ArcherPoint.
Read more “How To” blogs from ArcherPoint for practical advice on using Microsoft Dynamics Business Central.
Trending Posts
- Login Error: Communication protocol mismatch between client and server
- How to Make Measures Total Correctly in Power BI Tables
- The Microsoft Technology Stack – What Is It & Why Should You Care?
- MRP vs. MPS: Choosing the Right Planning Approach for Your Manufacturing Business
- Guide to How Manufacturers Can Implement Quality Control Systems Using Business Central
Stay Informed
Subscribe to Communications
"*required" indicates required fields