
Automated Intercompany Transactions in Microsoft Dynamics NAV 2018

Previous versions of Microsoft Dynamics NAV provided users with the facility to complete intercompany transactions, ensuring that both parties were provided with accurate records of these transactions. However, the previous process was manual – and time consuming. Taking care of sales and purchase invoices was a multi-step process that had to be repeated for every transaction.
Updated and Automated
This was updated with Microsoft Dynamics NAV 2018, improving efficiency by automating this process. Specifically, when two companies are engaged in sales and purchase transactions, this facility ensures that both parties receive the appropriate invoices every time a transaction is made: the seller receives a sales invoice and the buyer receives a purchase invoice without individual manual processes.
How it Works
Once two companies are engaged in sales and procurement transactions, it’s possible to set up the automation process. This is illustrated below, using Cronus USA as the buyer and Cronus Mexico S.A. as the seller.
Create Company Information Setup
Navigate to the selling company’s communication tab. In our example, we navigate to Cronus Mexico S.A./departments/administration/application setup/general/company information/communication tab
- IC Partner Code → ICP20
- IC Inbox Type → DatabaseFigure 1 – Intercompany Partner Code on the Selling Company’s Communication Tab in Dynamics NAV 2018
Create Intercompany Setup
The following is used to send intercompany sales invoices automatically without storing intercompany outbox transactions:
Navigate to the selling company’s intercompany setup under Financial Management. In our example, we navigate to Cronus Mexico S.A./departments/financial management/setup/intercompany postings/intercompany setup
- Intercompany Partner Code → ICP30
- Auto. Send Transactions → true / checked (new setup)

Figure 2 – Intercompany Setup in Dynamics NAV 2018
Intercompany Partner Setup
In our example, navigate to Cronus Mexico S.A./departments/administration/application setup/financial management/intercompany postings/intercompany partners
- In the Intercompany Partners window, complete the fields as necessary.
- For ICP20, inbox details should be Cronus USA (the buying company).
- Auto. Accept transactions should be checked (new setup on NAV 2018).
Please note that it helps to accept the IC Inbox Transactions automatically. This is handled using task scheduler/job queue within a time interval, and the document gets accepted automatically.
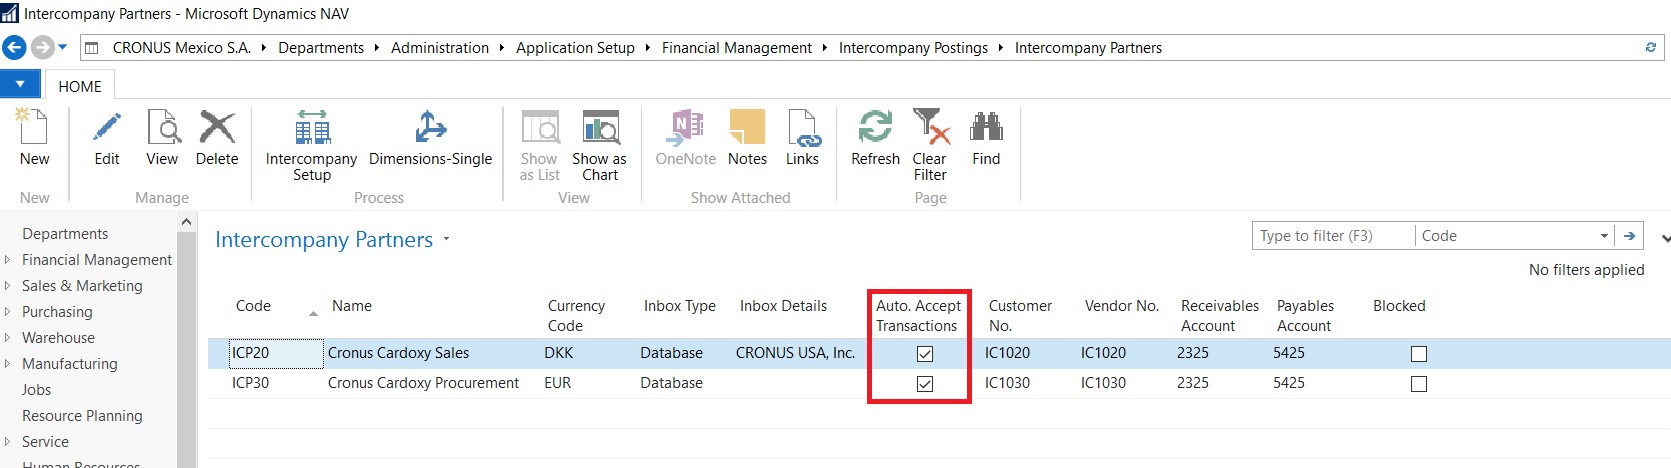
Figure 3 – Intercompany Partners Setup
Intercompany Partner Code Setup in Vendor Card
Navigate to Cronus Mexico S.A./departments/purchasing/planning/vendors/ic1020
Once there, set IC Partner Code as ICP20.
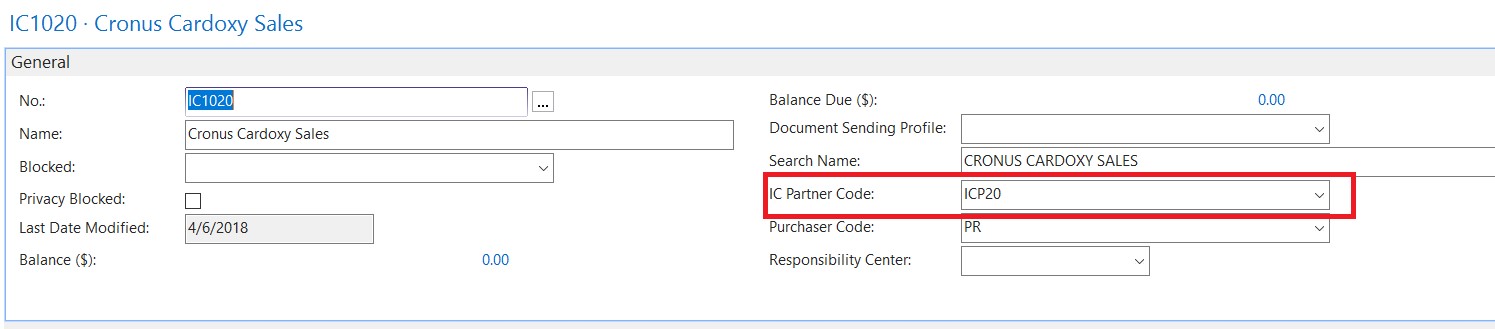
Figure 4 – Vendor Card Partner Code in Dynamics NAV 2018
Intercompany Partner Code Setup in Customer Card
Navigate to Cronus Mexico S.A./departments/purchasing/planning/vendors/ic1030
Once there, set IC Partner Code as ICP20.
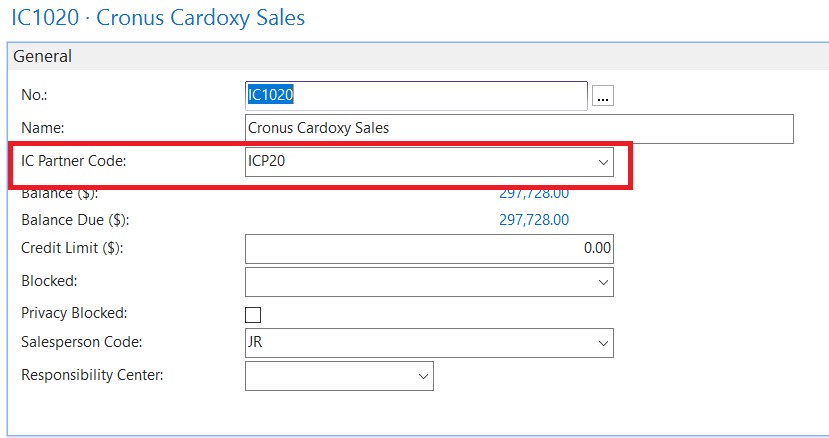
Figure 5 – Partner Code Setup on the Customer Card
Company Information Setup
The following example continues to use Cronus USA purchasing product from Cronus Mexico S.A. to demonstrate how to setup Company Information in Dynamics NAV 2018 for automated intercompany transactions.
Navigate to CRONUS USA/departments/administration/application setup/general/company information/communication tab
- IC Partner Code → ICP30
- IC Inbox Type → database
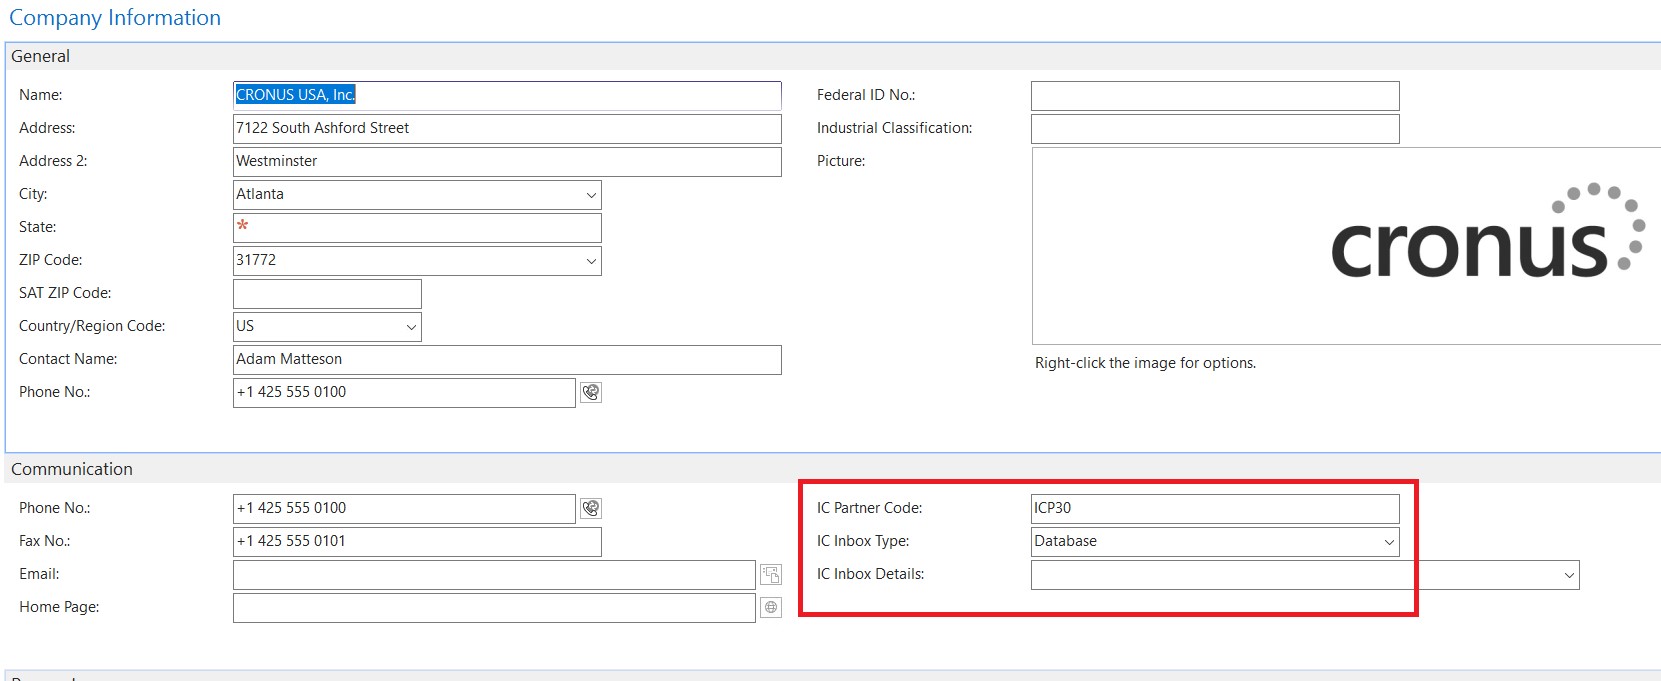
Figure 6 – Setup Intercompany Partner on the Buying Company’s Company Information Card
Intercompany Setup
Navigate to CRONUS USA/departments/financial management/setup/intercompany postings/intercompany setup
- Intercompany Partner Code → ICP30
- Auto. Send Transactions → true / checked (new setup)
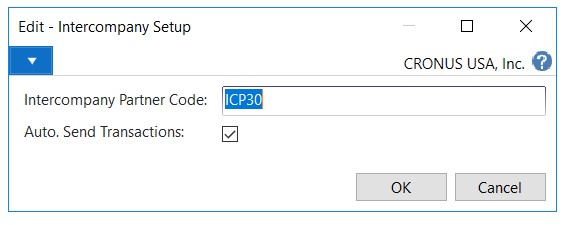
Figure 7 – Edit Intercompany Setup for the Buying Company
Intercompany Partner Setup
Navigate to CRONUS USA INC./departments/administration/application setup/financial management/intercompany postings/intercompany partners
- In the Intercompany Partners window, complete the fields as necessary.
- For Partner Code → ICP30, inbox details should be Cronus Mexico S.A.
Auto. Accept Transactions should be checked (new setup on Microsoft Dynamics NAV 2018).
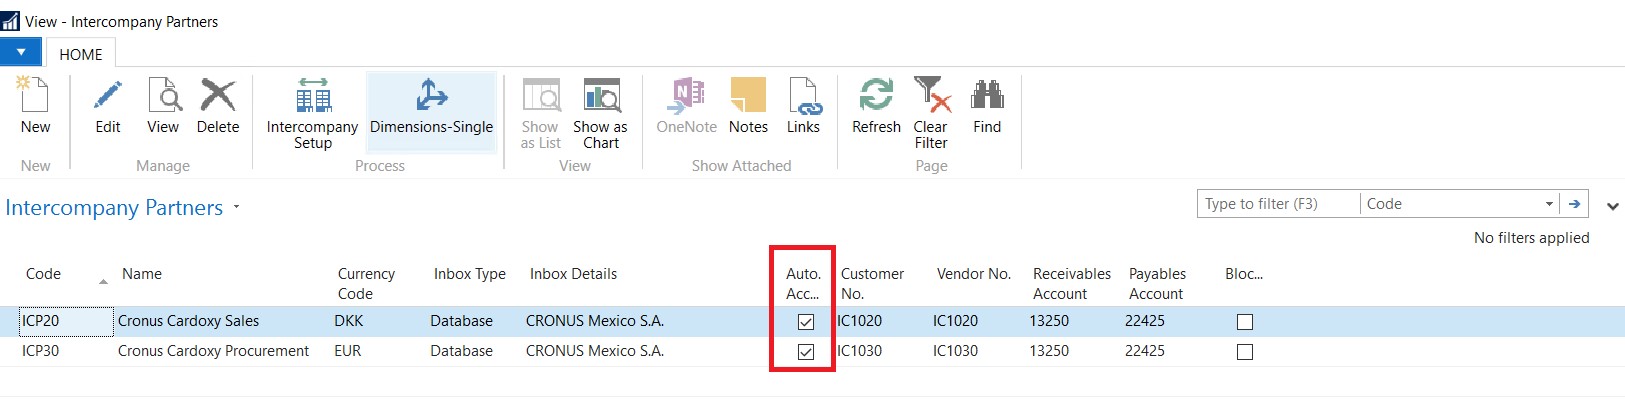
Figure 8 – Intercompany Partners Setup in NAV 2018
Vendor Card Setup
Navigate to CRONUS USA/departments/purchasing/planning/vendors/ic1030
Once there, set the IC Partner Code = ICP30
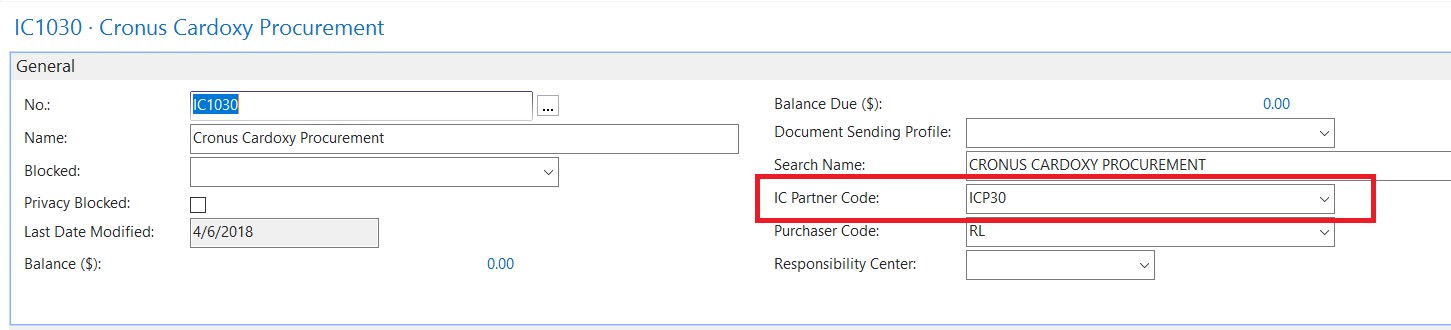
Figure 9 – Vendor Card Setup for the Buying Company
Customer Card Setup
Navigate to CRONUS USA/departments/purchasing/planning/vendors/ic1030
Once there, set the IC Partner Code = ICP30
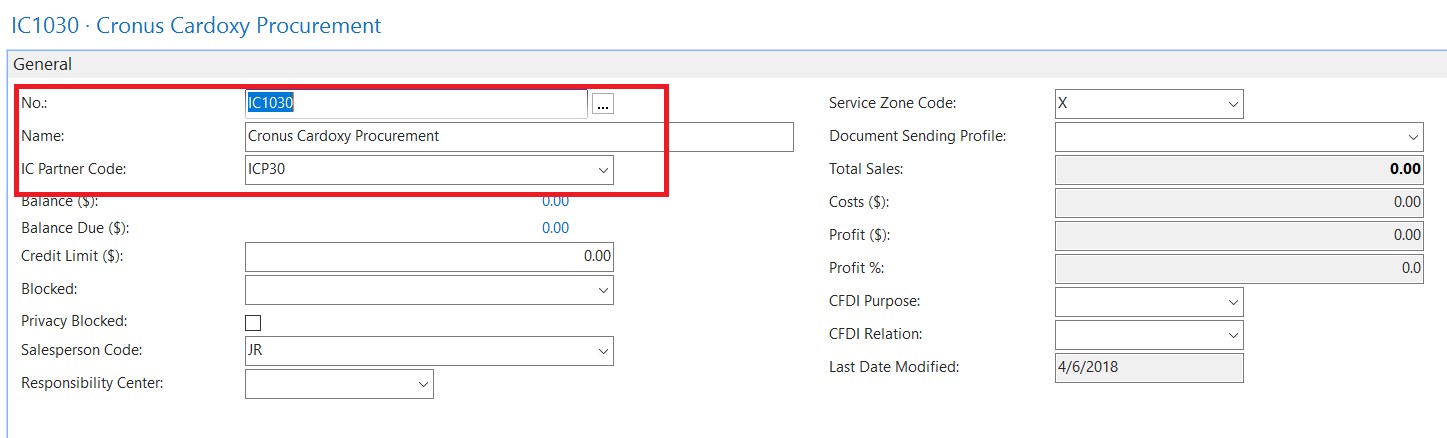
Figure 10 – Vendor Setup for Intercompany Automation
Create and Post Sales Invoice from Company (Cronus Mexico S.A.)
- Open the customer IC020
- Go to action → click Sales Invoice
- New sales invoice created
- In sales lines → select Type → item and no. → 1000
- Make sure IC Partner Ref. Type and IC Partner Reference are equal to sales line Type and No.
- Release and post sales invoice
- Refer to the screenshot below:
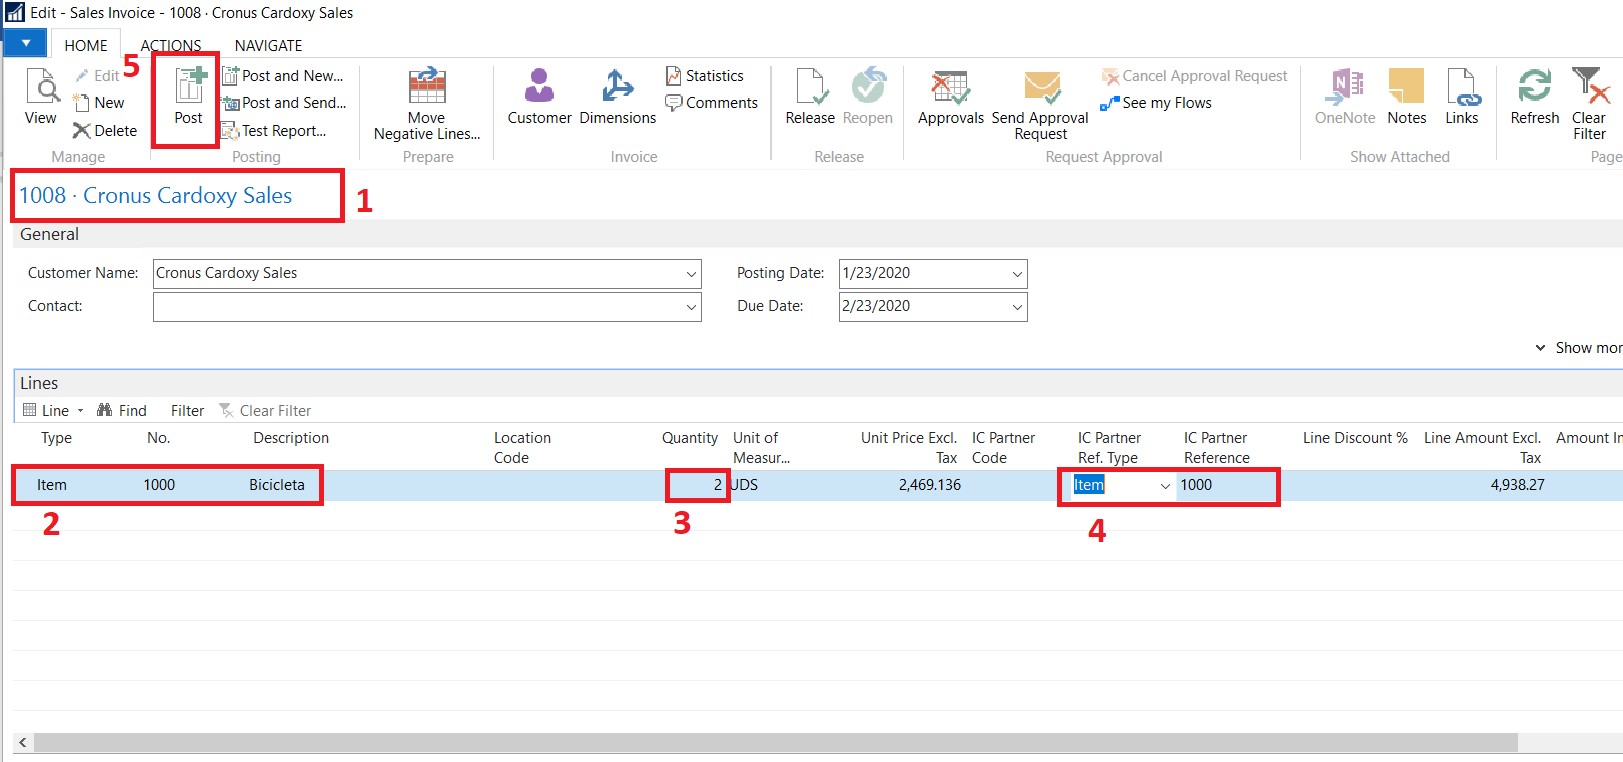
Figure 11 – Steps to Create and Post an Intercompany Sales Invoice - Once the document is posted successfully, open the second company, Cronus USA, and check the IC Inbox Transactions from CRONUS USA/departments/financial management/general ledger/intercompany inbox transactions.
- Check the document no.
- Check the action → Accept (This is according to Intercompany Partner Setup, above).
- Click the action → details; to view the complete document.
- Click “complete line action”.
- A new purchase invoice is created in company Cronus USA.
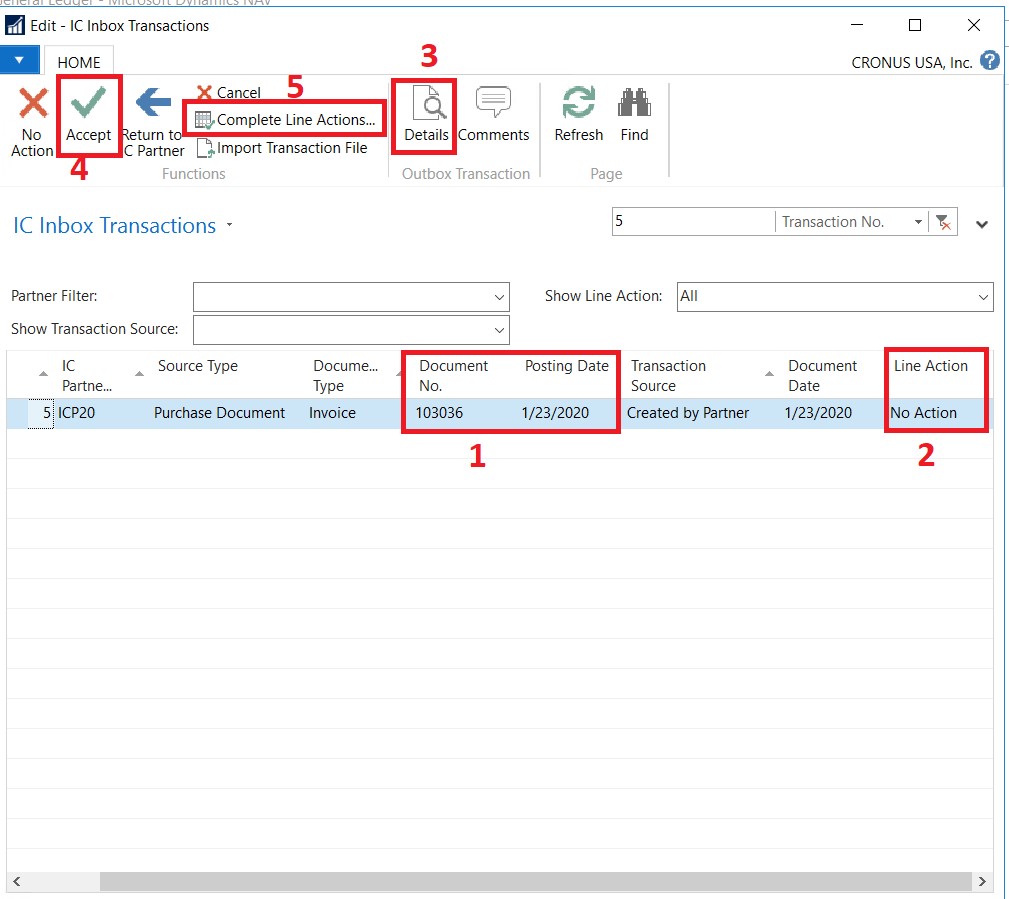
Figure 12 – Intercompany Inbox Transactions
- Open the purchase invoice and post the transactions. The document is then posted.
Automating intercompany transactions is another time-saving reason to consider an upgrade to Microsoft Dynamics NAV 2018. For a free upgrade estimate, request our upgrade estimate worksheet, so you can budget for your next Dynamics NAV upgrade.
For more information on this or other Microsoft Dynamics NAV topics, please contact ArcherPoint.
Read more “How To” blogs from ArcherPoint for practical advice on using Microsoft Dynamics NAV.
Trending Posts
- Login Error: Communication protocol mismatch between client and server
- How to Make Measures Total Correctly in Power BI Tables
- The Microsoft Technology Stack – What Is It & Why Should You Care?
- MRP vs. MPS: Choosing the Right Planning Approach for Your Manufacturing Business
- Guide to How Manufacturers Can Implement Quality Control Systems Using Business Central
Stay Informed
Subscribe to Communications
"*required" indicates required fields