Creating AL Snippets using Visual Studio Code for Dynamics 365 Business Central and NAV

AL snippets make programming in Microsoft Dynamics Business Central or Dynamics NAV easy. Let’s dig in.
What are AL Snippets, and what do they look like?
AL Snippets are pieces of AL code or small templates that can be recycled and reused for faster coding in Visual Studio code. They have the prefix “t”, followed by a meaningful name, like taction, tfield, ttrigger, etc.
Standard snippets
Dynamics NAV/BC provides a number of standard, pre-defined snippets. This standard snippet list is divided into 4 categories, as shown in Figure 1:
Figure 1 – List of standard, pre-defined AL snippets in Microsoft Dynamics Business Central or NAV
How to create an AL snippet
You can create AL snippets to fit your requirements using Visual Studio. To accomplish this task, there is a file AL.json (AL) where user-defined snippets are stored. Open the file using one of the 2 methods:
- Choose these Options: Go to File |Preferences | User Snippets.
- Choose these Options: Run Command Pallette (Ctrl + Shift + P) and select Preferences: Configure User Snippets.
When you open AL.json file for the very first time, it will contain the commented piece of code as shown in Figure 2.
Figure 2 – AL.json file opened for the first time, with a commented piece of code
The code in Figure 2 provides a pretty clear picture of how to create snippets of your own. Now, let’s start by creating our own AL Snippet and try using the User Defined Snippets while coding in AL files by following the below steps:
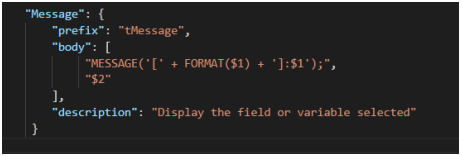
- Replace the predefined code in the AL.json file to the code shown in Figure 3. This code snippet will be added to the application as a message statement.
Figure 3 – Replacing the pre-defined code in the AL.json file with new code - Go to the HelloWorld.al file or whatever file you want to insert a message.
Figure 4 – HelloWorld.al file - In the new line, press “t”. This will activate Intellisense and show you the series of snippets, including the one you just created. Choose tMessage from the list, and it will add the message line with the cursor ready to accept the name of the field you want to add to the displayed message.
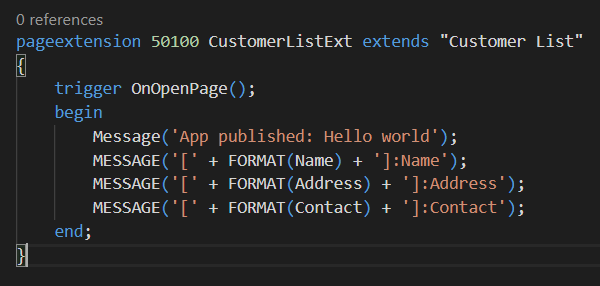
- As soon as you select the field and press tab, this will complete the line and move to the next line. Now, repeat the steps again and add as many messages as you can for the other fields as well. You will see the code something like the one in Figure 5.
Figure 5 – Messages added for fields
The AL snippet you have created will Write the code for the Messages. Similarly, you can define as many user-defined snippets as you like for other functions.
- After completing the code, Create the package (Ctrl + Shift + B), publish and install it (F5), and check your results while opening the Customer List.
If you have any questions about report building or other Dynamics NAV or Business Central questions for any version, contact ArcherPoint.
Read more “How To” blogs from ArcherPoint for practical advice on using Microsoft Dynamics Business Central or NAV.
If you are interested in NAV/Business Central development, check out our collection of NAV or Business Central Development Blogs.


