How to record permission sets in Microsoft Dynamics Business Central

In Microsoft Dynamics Business Central, Permission Sets are assigned to users based on the job tasks they perform. The Permission Sets as provided in your database might not always fit your company’s requirements. Creating new permission sets by hand can still be done, adding tables as needed, but recording a user’s activity in Business Central or NAV could be a better approach.
For each table, a user can be assigned different levels of access to: Read, Insert, Modify, and Delete. Below are step-by-step Instructions to record permissions.
To create or modify permission sets by recording your actions:
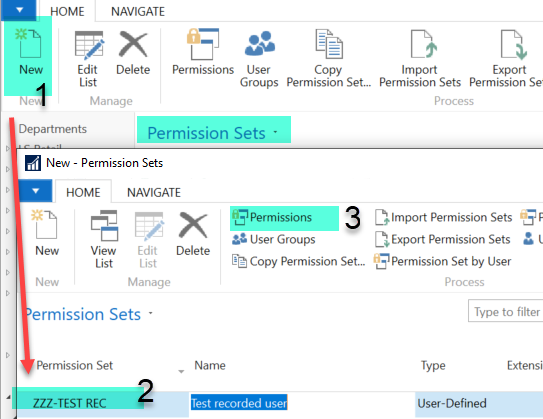
- In the Permission Sets window, choose the New Action to create a new Permission Set.
- On a new line, fill in the Permission Set and Name fields.
Figure 1 – Permission Sets window in Microsoft Dynamics Business Central - Choose Permissions in the ribbon.
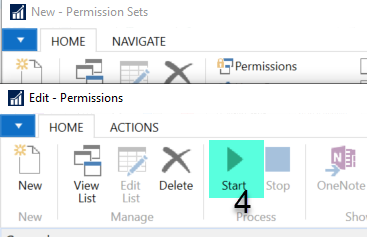
- In the Permissions window, to start the recording, choose the Start action.
Figure 2 – Permissions ribbon and window in Microsoft Dynamics Business Central - A recording process starts and will capture all your actions in the user interface.
- Leave the Permission screen open during recording; do not close it.
- Go to the various pages and complete activities in Dynamics you want to allow the user to access or carry out an activity task to record the permissions for that user.
Figure 3 – Editing Permissions in Microsoft Dynamics Business CentralExtra tips:
– Fields that include table look-ups should also be opened, and if the user should be able create a new record, that should also be recorded.
– If the user will be creating a new record or modifying the record, such as GL, Customer, or Vendor, for example, be sure that activity is done during the recording.
– If a journal, sales order, or purchase order, for example, needs to be created (or deleted) and posted by the user, be sure this is activity is done during recording.
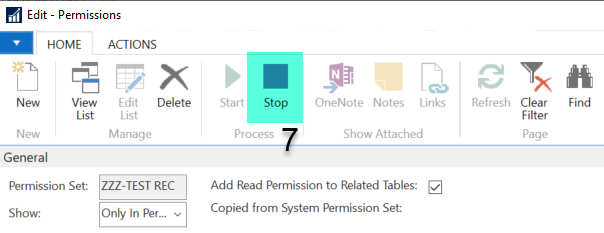
- When you are finished and want to complete the recording, return to the Permissions window, and then choose the Stop action.
Figure 4 – Completing a recording of permissions in Microsoft Dynamics Business Central - Choose the Yes button to add the recorded permissions to the new permission set.
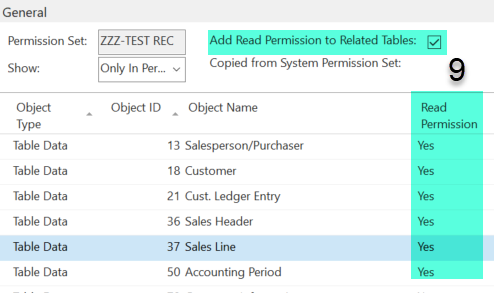
Figure 5 – Adding recorded permissions to a new permission set in Microsoft Dynamics Business Central - There are many related tables that a user may not click on during recording but will need access to and will need to be added to the permission set. Note the checkbox to “Add Read Permission to Related Tables,” be sure to check this box. Some Table examples include: zip codes, payment terms, accounting periods, etc.
- For each object in the Permission Sets recorded list, review and edit as needed to allow the users to read, insert, modify, or delete records in the recorded tables.
- You are now ready to use this new Permission Set and assign to the appropriate users.
- If some activity was missed during the initial recording, go back to the Permission Set and begin recording again to add more permissions to the set.
You can watch a demonstration of the process to record and create user type/role permission sets for Business Central / NAV in this short video.
If you have any questions about user security/permissions or other Microsoft D365BC or Dynamics NAV functionality for any version, contact ArcherPoint.
Read more “How To” blogs from ArcherPoint for practical advice on using Microsoft D365BC and Dynamics NAV, or learn more about Microsoft Dynamics 365 Business Central in these videos from ArcherPoint.


