Dynamics NAV 2015: Create Reports in Word and Party Like a Rock Star!

In every implementation of Microsoft Dynamics NAV (Navision) I have worked on, it has been requested that we change the way that the customer facing invoice looks. This is not an unusual request as every business is unique, so it is natural to want your invoice to look the way you want it to. Now, if you aren’t adept at modifying the invoice report yourself (which is close to 100% of the time), then it requires a custom modification done by a NAV developer, which of course, adds cost to the project. Well, that is no longer the case! We can now rejoice and throw huge parties filled with decadent food and drink, full body massages, and presents worthy of a rock star, because Dynamics NAV 2015 has put the power of invoice editing into the general layman’s hands!
OK, so maybe it is not as exciting as I might portray it to be, but it really is very cool! NAV 2015 lets you take an existing report, modify it in Microsoft Word, and then use the new modified report. Pretty slick! Let’s take a look at a very simple example of how to accomplish this.
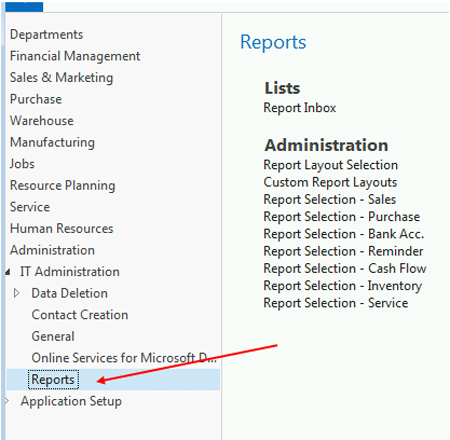
From the navigation pane, select Administration > IT Administration > Reports:
Figure 1 – NAV 2015 Navigation Pane
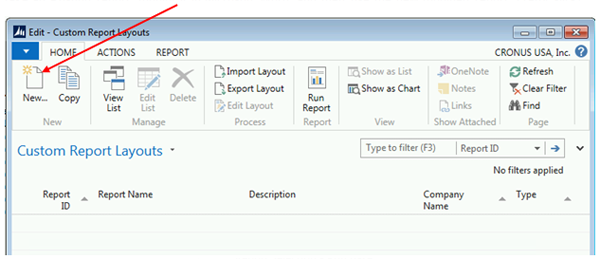
The first step is to create a new Custom Report Layout. Select Custom Report Layouts from the reports menu, and in the window that opens, press the New button in the top left corner:
Figure 2 – Custom Report Layouts Window
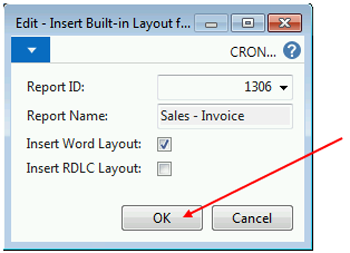
Select the report you wish to modify, choose to Insert the Word Layout, and press OK. In our example, we are going to modify Report 1306 – Sales – Invoice, which has an existing Word layout to modify. Note that if no Word Layout exists for that report, you will have to create one from scratch.
Figure 3 – New Custom Report Layout Window
After pressing OK, you will notice that a Custom Report Layout Line has been created. You can now specify which company you want the new layout to apply to. I have selected to use this layout in the CRONUS USA, Inc. company. The cool part about this is that you can create different layouts for different companies!
Figure 4 – Custom Report Layout Line
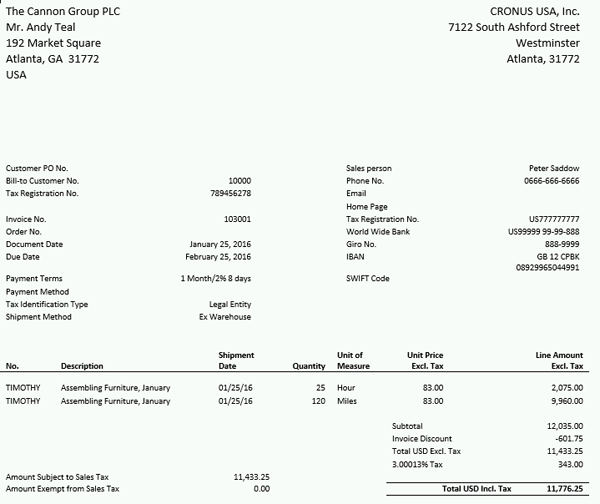
Before we edit the report layout, let’s first take a look at what the sales invoice looks like in its current state:
Figure 5 – Unedited, Boring Invoice
Now it is time to edit it! From the Home ribbon of the Custom Report Layouts window, press Edit Layout.
Figure 6 – Custom Reports Layout Window
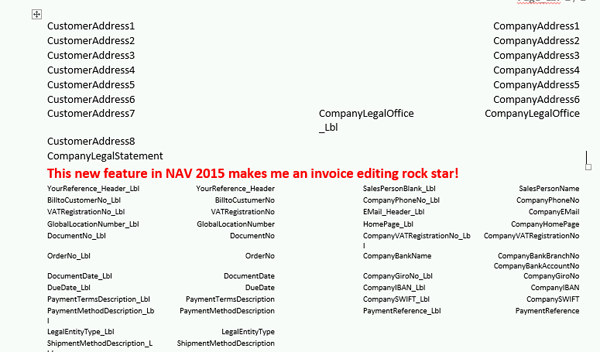
Since we specified that this is a Microsoft Word Layout, lo and behold, Microsoft Word magically opens! In Word, make the changes you desire. I have made the following blatantly obvious change to the invoice for our example:
Figure 7 – Microsoft Word Window
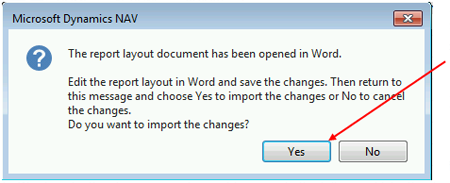
After making your changes, save the Word document and close it. Upon closing it, you will be prompted with the following dialog box. Answer Yes to import the layout:
Figure 8 – Import Changes Dialog box
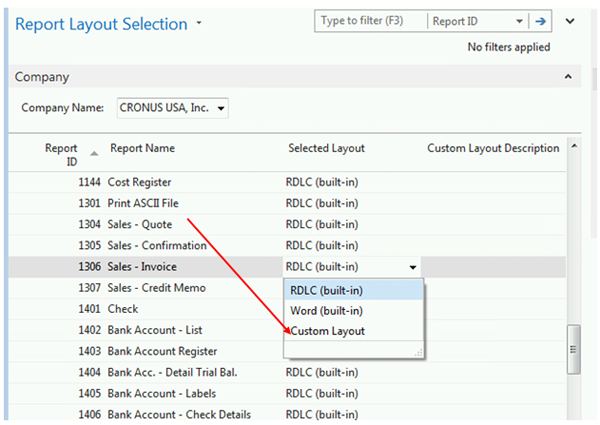
Finally, we need to tell NAV to use the new report layout we created. From the Reports page, choose Report Layout Selection. In this window, find the report you created the layout for and change the Selected Layout to “Custom Layout.”
Figure 9 – Report Layout Selection Window
This will open a list of the custom layouts you created for that report (remember there could be more than one). Select the one you want to use and then Press OK and OK again to close both windows.
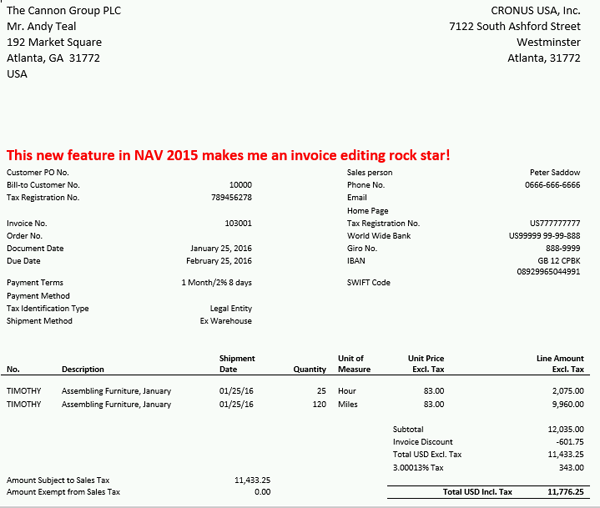
Let’s now take a look at the edited invoice! Drum roll please…..
Figure 10 – Awesome Edited Invoice
So how does it feel to be an invoice editing rock star? Pretty good, right? I think that, like all rock stars, you deserve a drink (or five, as rock stars frequently indulge in)! And I can think of no better drink to recommend on this cold winter day than this tasty Hot Mulled Wine! I’ve made it, it’s awesome…just like you!
Read more “How To” blogs from ArcherPoint for practical advice on using Microsoft Dynamics NAV.
Trending Posts
Stay Informed
Choose Your Preferences
"*required" indicates required fields

