Getting the Most out of NAV by Creating On-the-Fly List Reports or Saved Views

In this blog, we will explain how to create saved views to help in your daily work process. When you think of how to make your day more efficient, think about what data or groups of data you need to see on a regular basis. Inside of NAV you can have different list views – the list view is a grouping of data that you set filters for – and in the different list views you can determine what data you want to see.
In the following example, we are going to create a saved view for all items with a replenishment system Production Order with Production BOM No missing:
- Open the item list.
- You can choose to show or not show the columns you want to filter.
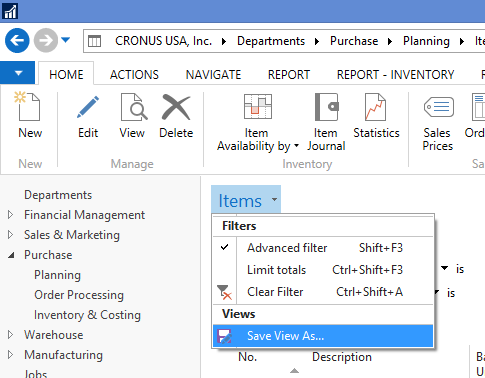
- Select the drop down for the blue word “Items”; select Advanced filter.Figure 1 – Selecting the Item drop-down from the Item Card
- Filter on:
Figure 2 – Filter on Missing BOM - When you are satisfied with your filtered list, you can then save the filter to quickly retrieve the data at any time.
- Select the drop-down for the blue word “Items“; select “Save View As”.
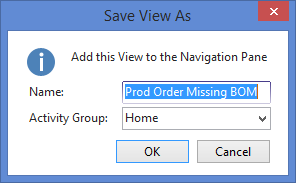
Figure 3 – Select Save View As - In the name you can type “Prod Order Missing BOM” or your desired name.
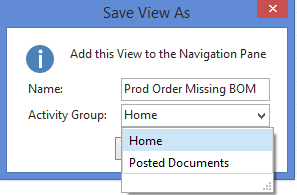
Figure 4 – Name your saved view - For the activity Group leave “Home.” You have the options of Home or Posted Documents.
Figure 5 – Choose “Home” for your Activity Group - Select OK.
- You will be asked to restart the application to make the changes. Select Yes if the time is proper.
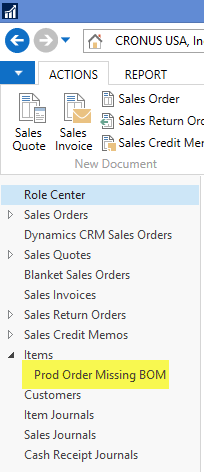
Figure 6 – Restart to save changes - Once you have restarted NAV, you will see your new saved view under Items.
Figure 7 – Saved View now shows in Microsoft Dynamics NAV navigation pane
Knowing the options for saving views in Dynamicss NAV will help you be more efficient in your day to day work. For more ideas on saving views, and other NAV efficiency tips, please contact one of our NAV experts today.
For more step-by-step instructions on how to perform specific tasks in Microsoft Dynamics NAV, see our collection of How-To blogs.


