How to Create Drop Shipments in Microsoft Dynamics NAV 2015

Need to ship an item directly from the Vendor to the Customer? Let’s walk through how to set up NAV 2015 to be able to handle this process.
A drop shipment is a shipment of an item or a consignment of items from one of your vendors directly to one of your customers. Before you can use this feature, you must first set up the customer, vendor, and item cards necessary for the order.
Set up your Purchasing Codes
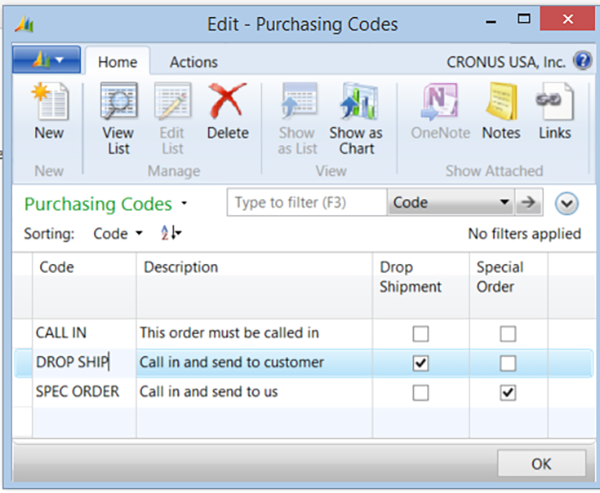
First you will need to set up your Purchasing Codes with Drop Shipment field checked.
Go to File Departments > Purchase > Administration > Order Processing > Setup > Purchase Codes
Figure 1. Setup Purchasing Codes with Drop Shipment field checked.
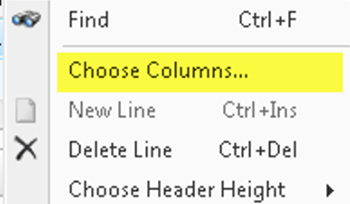
Second, you will need to set up your Sales Order Lines to show Purchasing Code and Drop Shipment field. If you do not see Purchasing Code and Drop Shipment field, right click the mouse to show a list of options. Select the option to Choose Columns.
Figure 2. Show Purchasing Code and Drop Shipment fields.
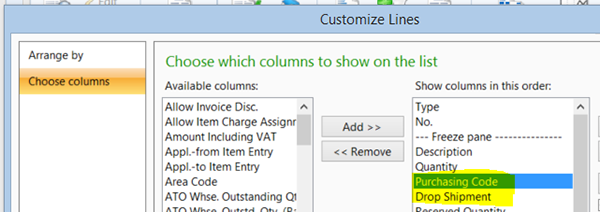
The Customize Lines window will appear, as shown below. Select the “Purchasing Code” and “Drop Shipment” from the Available Columns on the left side. Once you have the field you want highlighted select the Add button.
Figure 3. Highlight the “Purchasing Code” and “Drop Shipment” and select the Add button.
To Create a Drop Shipment
Create a Sales Order: Go to File Departments > Sales & Marketing > Order Processing > Sales Orders
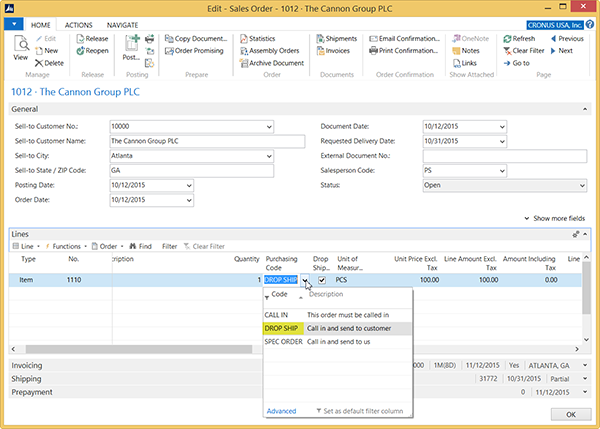
On the sales line, in the Purchasing Code field, select a purchasing code that has a check mark in the Drop Shipment field.
Figure 4. Select the purchasing code for the Drop Shipment.
Create a purchase order to order the corresponding items from your vendor: Go to File Departments > Purchase > Planning > Requisition Worksheets
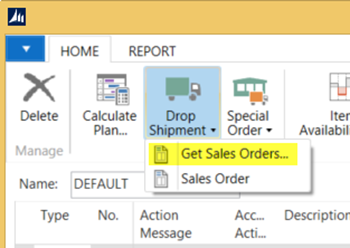
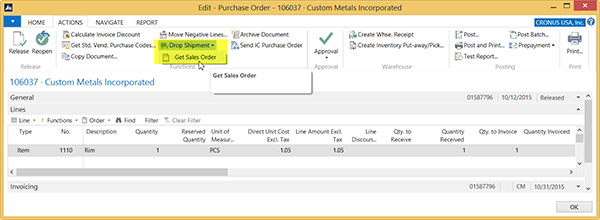
On the Actions tab, in the Functions group, choose Drop Shipment, and then choose Get Sales Orders.
Figure 5. Choose Get Sales Orders on the Actions tab.
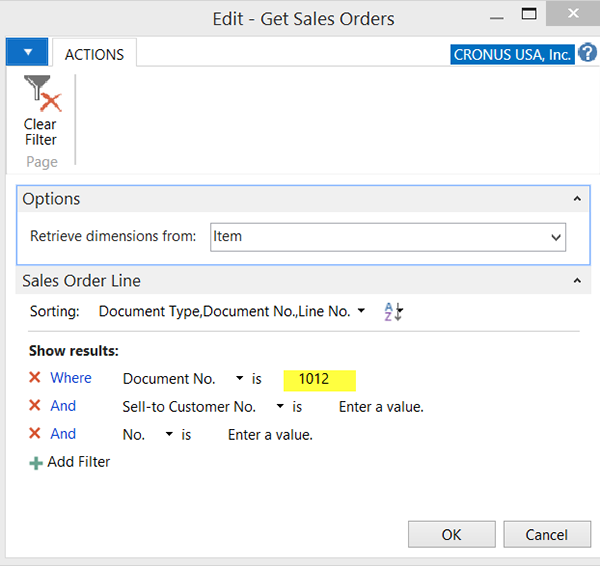
In the Get Sales Order window, fill in the filters to find the relevant sales order.
Figure 6. Fill in the filters in the Get Sales Order window.
Choose the OK button.
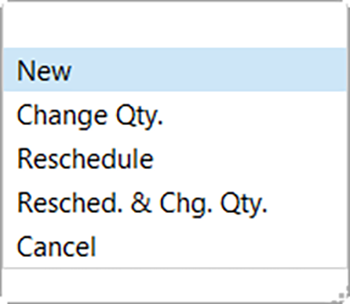
Figure 7. Specify an action to take to rebalance the current demand-supply situation.
On the requisition worksheet line, in the Action Message field, NAV defaults to New. Specify an action to take to rebalance the current demand-supply situation. The value in the field may change after you have calculated a plan and when you edit the quantity or date fields on the planning line. The following action messages exist.
Action Message Options:
- New – Create a new order
- Change Qty – Change the quantity on an existing order
- Reschedule – Reschedule the due date on an existing order
- Resched. & Chg. Qty. – Reschedule the due date and change the quantity on an existing order
- Cancel – Cancel an existing order
Figure 8. Action Message Options.
You can define what is included in the batch job by placing a check mark in the Accept Action Message field for the relevant lines. You can also remove the check mark if you want to. The program includes only those lines that have accepted action messages in the batch job.
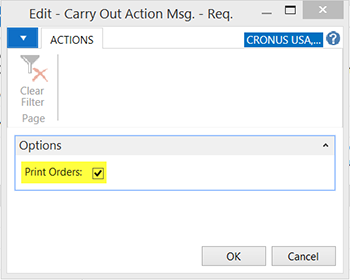
In the Req. Worksheet window, on the Actions tab, in the Functions group, choose Carry Out Action Message. You can choose to print the order. Choose the OK button.
Figure 9. Select Carry Out Action Message to choose to print the order.
This will carry out the action message that it proposed for the selected line in the Requisition Worksheet window. When the batch job is run, the program carries out the proposed action and changes the existing replenishment plan accordingly. This could result in any or all of the following:
- The program changes existing replenishment orders according to the action message proposal. This could change the quantity or rescheduling the due date.
- The program deletes any existing replenishment orders that carry the action message Cancel.
- The program makes new replenishment orders from proposals that carry the action message New. Note that these orders will not be posted, and you can view them in the relevant application area. You can make changes in the orders.
- The batch job deletes the lines in the requisition worksheet after it has performed the action message. The other lines remain in the requisition worksheet until they are either accepted at a later date or else deleted. You can also delete the lines manually.
Select the Print Orders field to print the replenishment orders that are created.
Note: If item tracking was assigned on the corresponding sales order, the Get Sales Order function will also copy the item tracking lines to the newly-created purchase order. You can view them from the Lines FastTab by clicking Actions, pointing to Line, and then clicking Item Tracking Lines. You cannot invoice the purchase order before the sales order is invoiced. You cannot post a drop shipment order that has item tracking unless item tracking is synchronized – serial numbers and lot numbers must be the same – between the two orders.
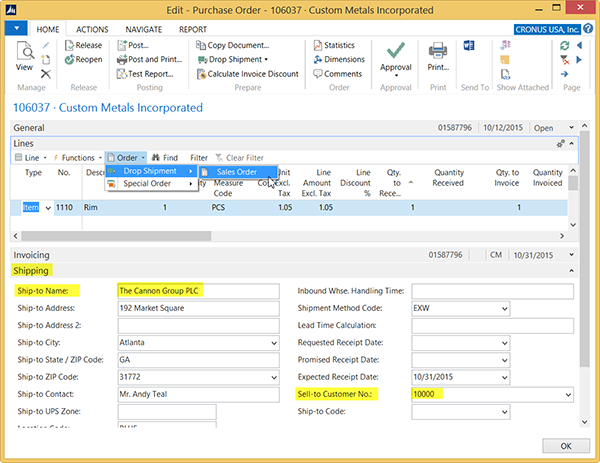
Now that the Purchase Order and the Sales Order are linked, the Purchase Order auto populates the Sell-to Customer No., Ship to Name, Address and Shipment Method Code.
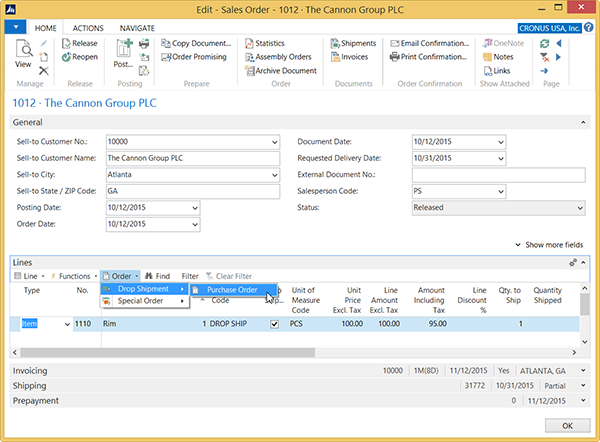
After you have released the purchase order, you must wait until the vendor informs you that the items have been shipped to the customer. You can then post the sales order and thereby post the drop shipment. When you set up the purchase order, use the function Drop Shipment, Get Sales Order to link to the relevant sales order. The sales order lines will be copied to the newly-created purchase order.
Figure 10. Use the function Drop Shipment, Get Sales Order to link to the relevant sales order.
Figure 11. Drop Shipment, Sales Order.
Figure 12. Drop Shipment, Purchase Order.
To Post a Drop Shipment
In the Sales Order window, on the Actions tab, in the Posting group, choose Post, and then choose either Ship to invoice it later, or Ship and Invoice to invoice it immediately. After you have posted the sales order as shipped, you can also post the purchase order as received. If the sales order has been invoiced, you can also invoice the purchase order. It is recommended that you print a Test Report before you post the invoice.
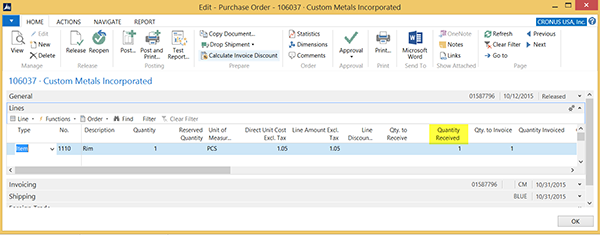
Note: When you receive the Items in on the Sales Order it will auto receive the Purchase Order Items.
Figure 13. Purchase Order Items are auto received.
To Post a Purchase Invoice
Select the Purchase Order (106037).
From the Purchase Order filled in all the information on the purchase invoice.
It is recommended that you print a Rest Report before you post the invoice.
Choose Post or Post and Print.
Choose Invoice and then choose OK.
For more information on how to create drop shipments in Microsoft Dynamics NAV, please contact the Experts in Microsoft Dynamics NAV at Archerpoint.
Read more “How To” blogs from ArcherPoint for practical advice on using Microsoft Dynamics NAV.

