
Microsoft Dynamics NAV 2009 R2 - Creating Recurring General Journals

The Recurring General Journal window in Microsoft Dynamics NAV (Navision) is used to post transactions that recur with few or no changes to G/L, bank, customer, vendor and fixed assets accounts. In a recurring general journal, you enter the relevant information for the transaction, such as the posting date, amount and the accounts to which you want to post. You also enter information that tells NAV about how often the transaction is posted. You can also specify automatic reversal the day after the posting date and allocate an amount among several accounts. The information you enter in a journal is temporary and can be changed until you post the journal.
After you post a recurring journal, the journal will contain the information for the next recurring transaction, and the posted transactions will be posted to individual accounts. You can view the results of posting a journal in the ledger entry windows and register windows. Posting with a general journal always creates entries on G/L accounts.
This blog explains how to create a recurring general journal in Microsoft Dynamics NAV R2. NOTE: In my next blog, I will explain how to do the same in Microsoft Dynamics NAV 2013 R2. If you need instructions for another version of NAV, please contact ArcherPoint.
Go to Departments>Financial Management>Periodic Activities>General Ledger>Tasks>Recurring General Journals
Recurring Method – The recurring principle determines how the amount on the journal line is treated after posting. For example, if you will use the same amount every time you post the line, you can let the amount remain. If you will use the same accounts and text on the line but the amount will vary every time you post, you can choose to delete the amount after posting.
| Fixed | The amount on the journal line will remain after posting. |
|---|---|
| Variable | The amount on the journal line will be deleted after posting. |
| Balance | The posted amount on the account on the line will be allocated among the accounts specified for the line in the Gen. Jnl. Allocation table. The balance on the account will thus be set to zero. Remember to fill in the Allocation % field in the Allocation List table. |
| Reversing Fixed | The amount on the journal line will remain after posting, and a balancing entry will be posted on the next day. |
| Reversing Variable | The amount on the journal line will be deleted after posting, and a balancing entry will be posted on the next day. |
| Reversing Balance | The posted amount on the account on the line will be allocated among the accounts specified for the line in the Gen. Jnl. Allocation table. The balance on the account will thus be set to zero. A balancing entry is posted on the next day. |
Table 1 – Recurring Methods
Recurring Frequency – The contents of the Recurring Frequency field determine how often the entry on the journal line will be posted. The field must be filled in. The recurring frequency formula can contain a maximum of 20 characters, consisting of numbers and the letters that NAV recognizes as abbreviations for time specifications. For example, if the journal line must be posted every month, enter “1M.” After every posting, the date in the Posting Date field will be updated to the same date in the next month. If you want to post an entry on the last day of every month, you can do one of the following: You can post the first entry on the last day of a month and enter the formula 1D+1M-1D (1 day + 1 month – 1 day). With this formula, NAV calculates the date correctly regardless of how many days there are in the month. You can post the first entry on any arbitrary day of a month and then enter the formula: 1M+CM. With this formula, NAV will calculate one full month + the remaining days of the current month.
Posting Date – Enter the posting date for the entry.
Document Type – Select the type of document that the entry on the journal line is. To see the options, click the AssistButton in the field:
- (Blank): ordinary G/L entry
- Payment: payment from a customer or to a vendor
- Invoice : invoice
- Credit Memo: credit memo
- Finance Charge Memo: finance charge memo in connection with a purchase or sale
- Reminder: reminder in connection with a purchase or sale
- Refund: payment to a customer or from a vendor
Document No. – Here you can enter a document number for the journal line. If the Posting No. Series field on the journal line contains a number series code, it will be used to assign a document number to the posted ledger entry. If the Posting No. Series field is blank, the contents of this field will be used as the document number on the posted entry. If the No. Series field on the journal batch is filled in, NAV automatically enters the next number in the series in this field. If NAV does not automatically assign the document number, you must redefine the number series in question. You can manually enter a document number if the No. Series field on the journal batch is blank. If the journal is a recurring journal and the Posting No. Series field on the line is blank, you can enter a formula here that will be used to create a document number for each posted entry. The document number will be updated automatically every time the journal is posted. (You can also choose to enter a fixed text that is used every time the journal is updated.)
You can create a document number formula with one of the following codes:
| Code | Result |
|---|---|
| %1 | Current day (for example, Monday) |
| %2 | Current week (for example, 52) |
| %3 | Current month number (for example, 1) |
| %4 | Current month name (for example, January) |
| %5 | Current accounting period name (for example, January) |
Table 2 – Document Number Formula Codes
Example: If the entry’s document number will be “R (rent) + current month,” enter “R%3” in the field. The document number for January will then be R1. If there is more than one line in the journal, NAV will automatically retain the same number on subsequent lines until the balance for the journal is 0. The next consecutive number will then be entered on the next line.
Account Type
- G/L Account
- Customer
- Vendor
- Bank Account
- Fixed Asset
- IC Partnership
Account No. – Select the number of the account that the entry on the journal line will be posted to. To see the existing account numbers, click the AssistButton in the field. The list that appears depends on the account type you have chosen in the Account Type field: G/L accounts, bank accounts, customer, vendor or fixed asset accounts.
Description – This field shows a description of the entry. NAV automatically retrieves the description when the Account No. field is filled in. If the journal is a recurring journal, you can choose to let the description be updated automatically every time the journal is posted. (You can also choose to enter a fixed text that is used every time the journal is updated.) To have NAV update the description automatically, enter a code that represents the number NAV will insert. You can choose from document formula codes in the table above.
Amount – The amount is in the currency represented by the code that is entered Currency Code field:
- Debit amounts must be entered without a plus or minus sign.
- Credit amounts must be entered with a minus sign.
- Instead of using this field, you can enter the amount in the Debit Amount field or the Credit Amount field.
Allocated Amount – This field shows the amount that has been allocated when you have used the Allocations function in the Gen. Jnl. Allocation table.
Expiration Date – Enter the last date on which the recurring journal will be posted, if you have indicated in the Recurring field of the General Journal Template table that the journal be a recurring journal. The field determines the date on which the line will be posted for the last time. The advantage of using the field is that the line will not be deleted from the journal immediately, and you can always replace the present expiration date with a later one so that you can use the line further into the future.
Applies-to Doc. Type – This field is used if the journal line will be applied to an already-posted document. If this is the case, enter the type of the document that will be applied to. The field is used only if the account type is a customer or vendor account. If the journal line will be applied to more than one entry at the same time, you must use the Set Applies-to ID function instead of this field. This function does not use the Applies-to Doc. Type field or the Applies-to Doc. No. field, but uses the Applies-to ID field instead.
Applies-to Doc. No. – This field is used if the journal line will be applied to an already-posted document. If this is the case, enter the number of the document that will be applied to. The field is used only if the account type is a customer or vendor account.
Applies-to ID – This field shows the entries that will be applied to by the journal line if you use the Apply Entries facility.
On Hold – This field is used when the journal line has been invoiced and you execute the payment suggestions batch job (on vendor entries) or you create a finance charge memo or reminder (on customer entries). The field is used only if the account type is a customer or vendor account. By using this field, you can decide whether the posted journal line will be included in calculation of payment suggestions or reminders and finance charge memos.
Bank Payment Type – Here you can enter the code for the payment type to be used for the entry on the payment journal line. To see the available options, click the AssistButton in the field.
: Choose this option if you do not want to create a check. This is the default option. - Computer ChecK: Choose this option if you want NAV to create and later print a check for the amount on this payment journal line. See below.
- Manual Check: Choose this option if you have created a check manually and want NAV to create a corresponding check ledger entry for this amount. With this option, you cannot print checks from NAV. See below.
- Electronic Payment: Choose this option if you want NAV to export this payment, with other payments, to a file and then transmit that file to your bank to electronically transfer the payments from your bank account to the payee’s bank account. See below.
Reason Code – The field shows the reason code that has been entered on the journal lines.
Dimensions – Here you can select the dimension value code that the journal line is linked to.
- Region
Test Report – Select Action>Posting>Test Report
- Options – Show Dimensions, select if you want to see Dimensions
- Gen. Journal Line – Will default filters from batch.
- Select Print or Preview to review entries prior to posting.
- Post – Select Post in Tool bar or select Actions>Posting>Post. Select Yes to proceed, and then select OK.
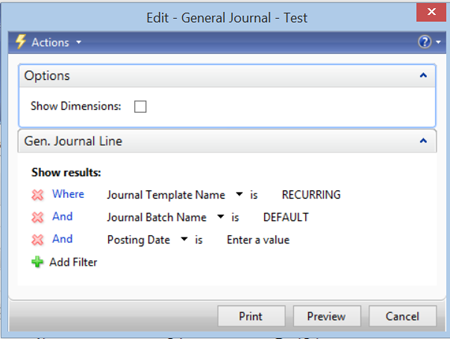
Figure 1 – General Journal Test Window
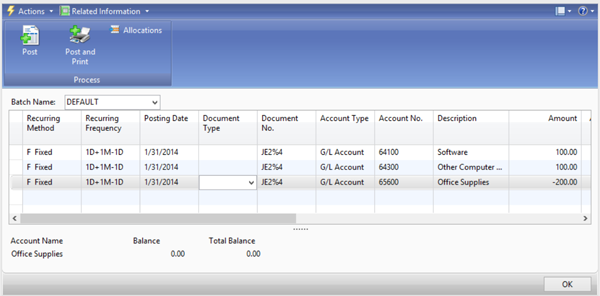
Figure 2 – Example of a Recurring Journal
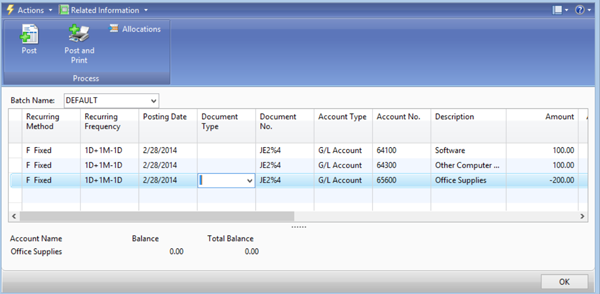
Figure 3 – Example of a Recurring Journal after a Post. Notice that the Posting Date incremented to the next posting month
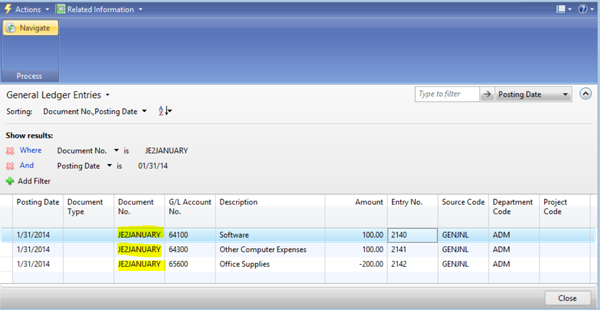
Figure 4 – Example of a Recurring Journal Ledger Entry. Notice that the Document No. is the document number and the month (Journal number and code 4% Current month name=JE24%)
In my next blog, I will explain how to do the same in Microsoft Dynamics NAV 2013 R2. If you need instructions for another version of NAV, please contact ArcherPoint.
Trending Posts
- Login Error: Communication protocol mismatch between client and server
- How to Make Measures Total Correctly in Power BI Tables
- The Microsoft Technology Stack – What Is It & Why Should You Care?
- MRP vs. MPS: Choosing the Right Planning Approach for Your Manufacturing Business
- Guide to How Manufacturers Can Implement Quality Control Systems Using Business Central
Stay Informed
Subscribe to Communications
"*required" indicates required fields