
Microsoft Dynamics NAV 2009R2 - How to Create a Sales Credit Memo

The Sales Credit Memo feature is part of Microsoft Dynamics NAV 2009R2’s out-of-the-box functionality and is a feature used by users daily. In this blog, I will explain how to use this convenient feature by demonstrating how to create a Sales Credit Memo.
NOTE: If you would like to read the summary on how to create a Sales Credit Memo, rather than the step-by-step instructions, skip down to the bottom of this blog.
Instructions for Creating a Sales Credit Memo
To begin, go to Departments>Financial Management>Receivables>Sales Credit Memo General Tab, select “New” and enter or tab off the field, and NAV 2009R2 will generate the No. automatically.
There are several tabs available which are outlined below:
General Tab
Select or enter the “Sell to Customer No.” Most of the information about the customer is copied from the Customer Card when you enter the customer number on the Sales Credit Memo. The Posting Date and the Document Date will default based on the Work Date but can be changed. Continue completing all the required fields.

Figure 1. Sales Credit Memo – General Tab
Line Tab
Line Type
- Blank – Used to enter text, message or comment
- Item – Used to enter an inventory item
- Resource – Used to enter Resources
- Fixed Asset – Used to enter a Fixed Asset
- Charge (Item) – Used to enter an Item Charge
No. – In this field, you can enter the number of a G/L account, an item, a resource, an additional cost or a fixed asset, depending on what you selected in the Type field. If you have defined default dimension values for the number you enter here, NAV will automatically fill out the shortcut dimension fields with these dimension values.
Description – If you chose Blank in the Type field, you can enter text here—a message or comment, for example. You can enter a maximum of 50 characters, both numbers and letters. If you chose Account (G/L) in the Type field, NAV will display the name of a G/L account. If you chose Item in the Type field, NAV will display the name of an inventory item.
Location – This field indicates the location in the inventory from which the items sold should be taken and where they should be registered. NAV automatically retrieves the location code from the sales header. The field will remain blank if the sales header does not contain a location code.
Quantity – In this field, you enter how many units of the item will be specified on the line. Even if you later change the item number, this quantity will remain on the line. You must always populate this field except on lines in which only the Description field is populated.
Unit of Measure Code – This field shows the unit of measure code NAV uses when it determines the unit price. If the Sale Unit of Measure field on the Item Card is populated, the value is automatically copied from that field when the sales line is populated.
Unit Price Excl. Tax – NAV automatically retrieves the price from the Unit Price field from the Item Card. If a sales price is set up for this item and this customer, the unit price will be retrieved from the Sales Price table but can be changed.
Note: If you change the unit price, NAV updates the contents of the Line Amount and the Line Discount Amount fields. The contents of the Inv. Discount Amount field will be deleted if the unit price is changed. This means that the invoice discount amount will have to be recalculated.
Tax Group Code – This field contains the tax group code of the item on this line. NAV automatically retrieves the code from the Tax Group Code field on the item card when the No. field on this sales line is populated. NAV will use the tax group code, in combination with the tax area code on the sales line, to determine the sales tax percentage and the G/L accounts for sales tax posting. Normally, you should not change the contents of this field, but it might be necessary in special cases where the default code is not appropriate.
Line Amount Excl. Tax – This field contains the net amount (excluding the invoice discount amount) of the line, in the currency of the sales document. If you have placed a check mark in the Prices Including VAT field, the amount displayed will include VAT.
Note: NAV calculates the amount, using the Line Discount Amount, Quantity and Unit Price fields when the document is released.
Amount Including Tax – This field will populate automatically.
Line Discount % – This field contains the line discount percentage that is valid for the items on the line. NAV automatically updates the discount percentage if the quantity is changed, so you do not have to recalculate the discount each time the quantity changes.
Department Code – In this field, select or enter the dimension value code to which the sale is linked.
Project Code – In this field, select or enter the dimension value code to which the sale is linked.
Appl-to Item Entry – In this field, you can enter the number of a particular item ledger entry to which the line should be applied. This means that the inventory decrease from this sales line will be taken from the inventory increase in the item ledger entry you select in this field. This creates a link so that the cost of the applied-to item ledger entry is carried over to this line. To see a list of the entries that you can apply to, click the AssistButton to the right of the field.

Figure 2. Line Tab
Invoicing Tab
This field indicates the customer to whom you will send the invoice. Unless you specify otherwise, NAV will automatically enter the number from the Sell-to Customer No. field in the Customer No. field, so the invoice will be sent to the same customer as the items.
Note: All sales headers contain two customer numbers, one (Sell-to Customer No.) indicating which customer you will ship the items to, and one (Customer No.) indicating which customer you will send the invoice to.
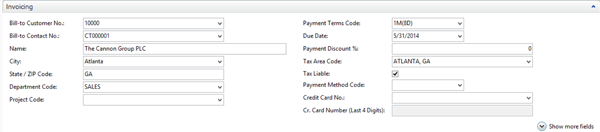
Figure 3. Invoicing Tab
Shipping Tab
This field contains the name to which the order will be shipped. NAV automatically retrieves the ship-to name from the Customer table when you populate the Sell-to Customer No. field, or from the Ship-to Address table if you have populated the Ship-to Code field. You can change the name either by entering a different code or by entering the ship-to code that stands for the ship-to address you want. If you change the ship-to code, NAV will automatically change the contents of this field.

Figure 4. Shipping Tab
Foreign Trade
This field contains the code of the currency of the amounts on the sales lines. NAV automatically retrieves the customer’s default currency code from the Customer table when you populate the Bill-to /Customer No. field. The field is blank if no currency code has been entered on the customer card. You can change the currency code if the customer wants to use a currency that differs from the customer’s default currency. NAV uses the currency code and the posting date on the sales header to find the relevant exchange rate in the Currency Exchange Rate table. This is the exchange rate that NAV will use to convert amounts on the sales lines to $ and/or an additional reporting currency.

Figure 5 – Foreign Trade Tab
Apply Entries
Select Apply Entries in the tool bar if you would like to apply entries to a posted document. You use the Apply Customer Entries window to apply open customer ledger entries for the relevant customer. You can apply entries to other open entries or to transactions on a journal line or sales document. The window is composed of two parts: The header, which displays information about the applying entry and gives you the option to see only the applied entries; and the lines, which display one line for each transaction. You cannot change the information in the fields on the line, except for the Applies-to ID field in which you can enter an applies-to ID, if relevant, and the Amount to Apply field in which you can specify exactly the amount you want to apply to the applying entry. At the bottom of the window are fields with details of the entry being applied.

Figure 6 – Application Tab
Test Report
Select Action>Posting>Test Report
Options:
- Ship/Receive – Insert a check mark next to each option that you wish to select.
- Invoice – Insert a check mark next to each option that you wish to select.
- Show Dimensions – In this field, you can place a check mark in the box if you want dimensions information for the journal lines that you want to include in the report.
- Show Item Charge Assgnt – In this field, you can insert a check mark if you want the test report to show the item charges that have been assigned to the sales document
Sales Document – The system will automatically fill filters based on the document printing, but can be changed.
Select Print, Preview or Cancel
Post
Select Post in the top tool bar to post the Bank Reconciliation Statement when ready, then select Yes or No
Creating a Sales Credit Memo: Summary
Using the Sales Credit Memo window, enter a Credit for your Customer. First you must create a new sales credit memo that has a document number. There are four FastTabs, enter general information about the sell-to and bill-to customers, such as name, address, document number, date, and information about shipment and currency. Most information about the customer is copied from the customer card when you enter the customer number on the sales credit memo. On the lines, enter information about the items. When you have finished filling in the sales credit memo, you can then print a Test Report to reviewing before posting. Then select “Post” to record the transactions.
Note: If part of the quantity on the original line has already been returned, NAV creates the new line with only the quantity that has not yet been returned. If the full quantity has already been returned, NAV does not create a new document line.
In my next blog, I will explain and explain how to reverse a sales entry by creating a sales credit memo in Microsoft Dynamics NAV 2009R2 using the copy function.
If you have any other questions on creating a Sales Credit Memos in Microsoft Dynamics NAV 2009R2, contact ArcherPoint. If you have specific questions or topics that you would like me to cover in future blogs, leave a comment and we will do our best to address your questions and issues.
If you enjoyed this blog, you might like to check out our collection of Development Blogs, as well as our “How To” blogs for practical advice on using Microsoft Dynamics NAV.
Trending Posts
- Login Error: Communication protocol mismatch between client and server
- How to Make Measures Total Correctly in Power BI Tables
- The Microsoft Technology Stack – What Is It & Why Should You Care?
- MRP vs. MPS: Choosing the Right Planning Approach for Your Manufacturing Business
- Guide to How Manufacturers Can Implement Quality Control Systems Using Business Central
Stay Informed
Subscribe to Communications
"*required" indicates required fields