Microsoft Dynamics NAV 2013 RDLC Reporting RBC Attacks: Part 2 of 10

In an effort to conquer and banish those dreaded RDLC Brain Cramp (a.k.a. RBC) pains in my head from working with Microsoft Dynamics NAV 2013 RDLC reports, I have first decided not to beat my head against the wall when I can’t resolve the report issue. That has helped.
Secondly, I have found solutions to some of the more common issues with RDLC reports, and I’d like to share those with my fellow sufferers. So, let’s press on to part 2 of this 10 part series.
In case you missed it, Part 1 of the RDLC Brain Cramp series discussed inconsistencies in line spacing.
RBC 2: Every Other Page Is Blank
One of the first things a developer should do when testing an RDLC report is to press the Print Layout button in preview mode. Why? Because if you haven’t seen your report in Print Layout view, you haven’t seen what it will look like when printed. Report Preview does not render reports in the same way as they are rendered when they are printed, due to such things as page size.
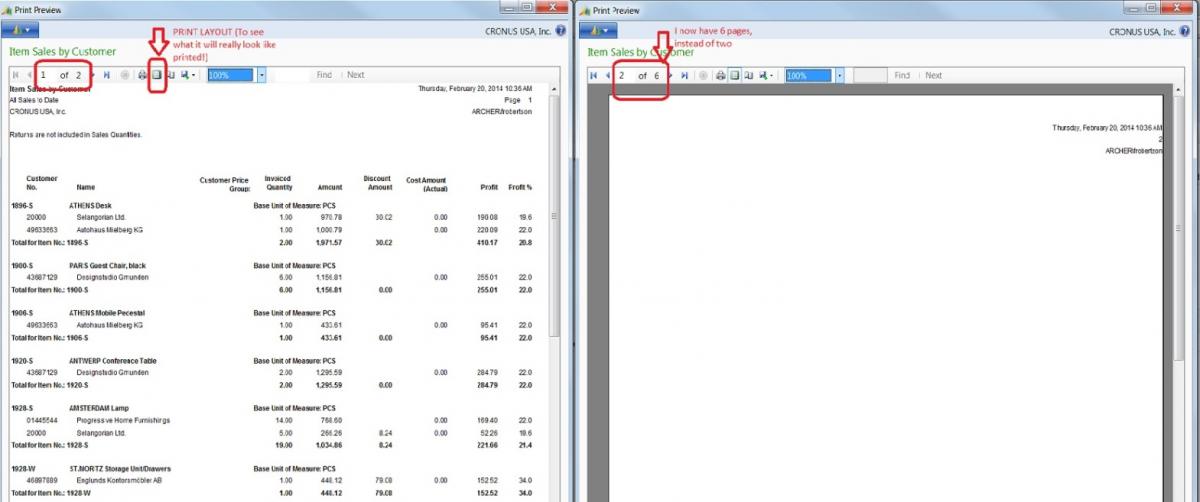
Here’s a perfect example of a time when Print Layout proved a problem. Notice the report below, which is shown in PRINT PREVIEW mode on the left, and PRINT LAYOUT mode on the right.
Figure 1 – Comparing the results of PRINT PREVIEW (on the left) with PRINT LAYOUT (on the right)
In PRINT PREVIEW, this is a two page report, and everything fits nicely on the page because the page size and margins have not been employed.
But once I click PRINT LAYOUT, notice that on the right my report has suddenly grown to SIX pages, and that every other page is empty – except for those nice little headings that say that I created this messL. Guilty as charged!
The every-other-page-blank issue is one that I hear about often. I think every Dynamics NAV developer has to encounter this at least once in order to learn about Report Properties.
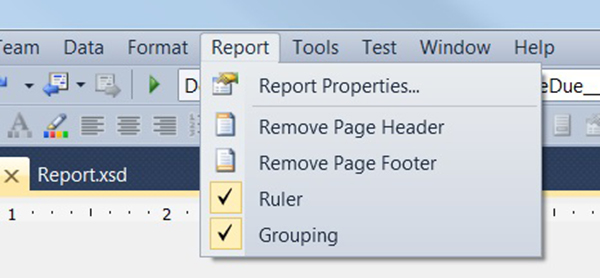
Report Properties can only be used when you have clicked within the Report Layout itself. If you have your cursor focus outside of the layout (such as in the text box properties window) the option at the top of Visual Studio for REPORT is not seen. Click within your report, and you’ll see the tab for REPORT is visible. Under REPORT, you have some fantastic options:
Figure 2 – Options available under the Report tab
First, click to display the RULER. This will allow you to have a visual of the size of your report across your Visual Studio Report Designer page. The ruler will focus the beginning of the ruler at the leftmost of the page, NOT at the beginning of the page after the margin is employed (see below in red).
To see the size of your margins, choose REPORT – REPORT PROPERTIES. From here, you can change your report units of measure from inches to centimeters, set the paper size, set the report to Landscape if it’s too wide for Portrait layout, and even determine the size of your margins.
ways to make a slow report run faster.
ArcherPoint is delighted to offer tips to developers throughout the NAV community, but code samples are not warranted, as all installations are different. It is advised that the developer verify that the solutions work for his or her installation of Dynamics NAV before implementing the code.
For more information on topics related to Microsoft Dynamics NAV development, read the ArcherPoint Developer Blog, written specifically for Dynamics NAV developers, or contact ArcherPoint directly.
Trending Posts
Stay Informed
Choose Your Preferences
"*required" indicates required fields


