
Updating Document Page Headers from Lines with UpdatePropagation

The UpdatePropagation property is new in Microsoft Dynamics NAV 2015. I learned about it when I had a customer request to have a total amount on the header section of a Sales Order page that would update when a Sales Line was changed. In previous versions of NAV, this was a challenge, but the UpdatePropagation property (and some well-timed calls to CurrPage.UPDATE) make it easy. (NOTE: Those of you using a version of NAV prior to 2015 are sadly out of luck on this one. Tune in next time for another entry that will hopefully be informative and entertaining.)
First, I should credit my sources. I learned about UpdatePropagation from this blog entry, and this other blog entry, and this YouTube video. Putting all of those together and doing a few experiments allowed me fulfill the customer’s request.
When you look at the UpdatePropagation property on a page, you’ll see that it has two options: “Subpage” and “Both.” Choosing “Subpage” results in the standard NAV page behavior that we’ve all come to know and love. Choosing “Both,” however, lets NAV know that when a subpage changes a record, the parent page needs to be updated as well. Setting UpdatePropagation to “Both” for a page without a subpage or for a parent page would not have any effect; the UpdatePropagation property only comes into play when you set it on a subpage.
There’s one other thing that you have to do to make UpdatePropagation work for you. You have to find the appropriate fields in your subpage that will update your header page and add a call to CurrPage.UPDATE so the header page will be updated. Otherwise, your header page won’t actually update and you’ll wind up screaming in frustration as I frequently do. (Thankfully, I work from home, so no one else has to hear my agonized wailing, except for my unfortunate cats.)
Let’s go through an example of how this should work using the Sales Order and Sales Order Subform pages.
I started by adding the Sales Header.Outstanding Amount ($) as my test field. That’s a flowfield that sums up the Outstanding Amount (LCY) field from each Sales Line record for a Sales Header, so it’s probably a good example of one sort of field that we’d want to update on a document header based on document line changes. I also added a field called TotalQty for testing, because I wanted to see how to make a calculated variable work instead of a flowfield. That one is intended to be the sum of the Quantity field for all the Sales Lines on our order. (I don’t know how often that would come up in real life, but it works well as an example.) And finally, I go into the Properties for the SalesLines subpage on the Sales Order form and I set the UpdatePropagation property to Both. (That last step is very important.)
On the Sales Order page, I added Outstanding Amount ($) and TotalQty fields so I could see my work. I put them on the General tab, because I’m lazy and I want to see results come up without having to look all over the page. I also had to add a function to calculate TotalQty so I didn’t have to write five lines of code over and over again, and I added it to the OnAfterGetRecord, OnNewRecord, and OnInsertRecord triggers.
On the Sales Order Subform page, I added a call to CurrPage.UPDATE to the OnDeleteRecord trigger, and also to the OnValidate triggers for the following fields: Type, No., and Variant Code. There are multiple other fields that would affect my Outstanding Amount ($) and TotalQty values, but they don’t end up needing a call to CurrPage.UPDATE because they’re already calling it as a result of existing code. (I will also confess that this is not the most exhaustively tested code I’ve ever put together, as it’s for a demo and not a production environment.)
The results work beautifully. When I delete a line or change a quantity or a unit price, the Outstanding Amount ($) and Total Qty. fields on my Sales Order header section update automatically! You can see the results in Figure 1.
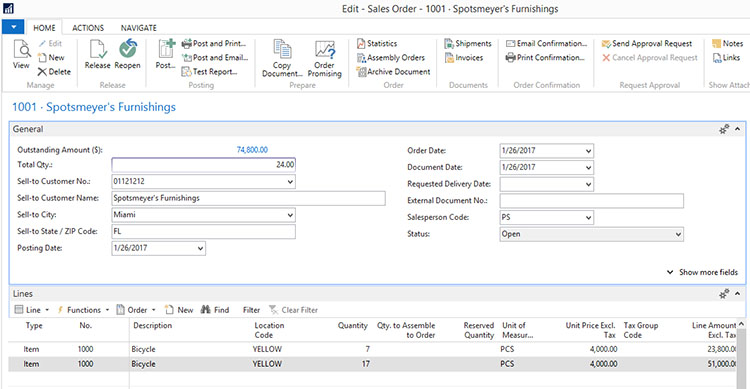
Figure 1. Updating fields in the Sales Order header section.
And that’s pretty much all there is to it. Have fun playing with this new NAV feature and see what you can do!
Bonus Video Game Update: As the three of you who follow my blog postings may know, I cannot end a blog post without talking about video games I’ve been playing recently. I picked up Project X Zone 2 recently, just because it came out here in the US, and I’ve barely touched it. Instead, I’ve been playing a lot of Street Fighter V. I was a Blanka player in Ultra Street Fighter IV, and I’ve moved to Necalli in V. My personal fan theory is that secretly, Necalli is Evil Blanka, kind of like how there was regular Ryu and Evil Ryu.
If you have any further questions about this or other development issues, contact one of our development experts at ArcherPoint. If you enjoyed this blog, you might like to read more of Tom Hunt’s blogs, or check out our collection of Development Blogs.
Trending Posts
- Login Error: Communication protocol mismatch between client and server
- How to Make Measures Total Correctly in Power BI Tables
- The Microsoft Technology Stack – What Is It & Why Should You Care?
- MRP vs. MPS: Choosing the Right Planning Approach for Your Manufacturing Business
- Guide to How Manufacturers Can Implement Quality Control Systems Using Business Central
Stay Informed
Choose Your Preferences
"*required" indicates required fields