
Using Microsoft Dynamics NAV for Electronic Payment (ACH) Transactions

Using Microsoft Dynamics NAV (Navision) for electronic payments to your vendors is an excellent way to save time and money. With this feature, you can reduce the hassle of printing checks, stuffing them into envelopes, and save on postage costs as well. Additionally, many vendors prefer electronic funds transfers, as they speed up the process of payments on their invoices and reduce confusion and errors regarding payments.
To use this feature in Microsoft Dynamics NAV, you will need to perform some setup in NAV. This document will go through the steps necessary in setting up this feature using NAV. The screenshots were taken from Dynamics NAV 2013 R2, but the functionality is available in earlier versions of NAV.
In a future document, we will explain the steps in using NAV to create, transmit, and Post electronic payments.
Prep Work
Bank Communications – Contact your bank to determine the format for ACH Files and Standard Entry Class Code (SECC). Discuss fees associated with using ACH Functionality and best methods to communicate transfers. NAV will prepare a file during the process of creating electronic payments; this file will need to be transmitted to your bank to facilitate the transfers. You will need to understand your banking requirements for this communication.
Format: Base NAV supports an NACHA standard format, which is used for US banks. If this format does not match the requirements of the user’s bank, the modification will need to be performed in software.
Standard entry class code: Base NAV supports a standard entry class code of CTX. CTX is one of the three prevalent class codes available in the United States (the others are PPD and CCD). If the user’s bank requires PPD or CCD, a slight modification to report 10083 will be required to format the data in this format.
Vendors – Contact the vendors you wish to pay using electronic funds, and gather the following Information from them to allow for the transfers:
- Vendor’s bank name
- Vendor’s bank branch number
- Vendor’s bank account number
- Vendor’s transit number
Dynamics NAV Setup Tasks
After gathering the information from your bank and vendors, you will be ready to start setting up NAV to use this feature. The setup is performed in four different areas: Company Information, Bank Account, Vendor Cards, and Vendor Bank Accounts. Below are the required steps for the setup.
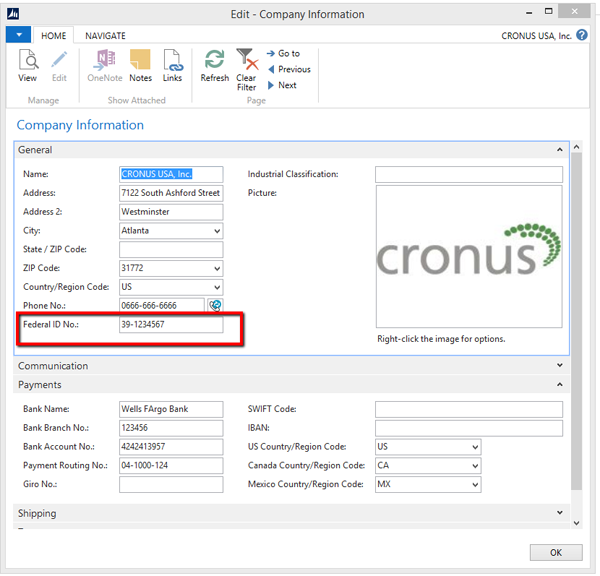
Company Information – General FastTab:
- For electronic payments, you normally don’t need to populate the Bank-related fields on the Company Information Card, Payments tab (it’s circled in the screenshot on page 1).
- You do, however, need to populate the General tab, Federal ID No. field, as this value is included in the Electronic Payment file.
Figure 1 – Company Information Card with Federal ID No. highlighted.
Bank Account Card – the following fields must be populated:
- General FastTab – note that the value in the Name field is also included in the Electronic Payment file
- Posting FastTab, Last Remittance Advice No. field
- When you select Export in the Payment Journal, Remittance Advices (Report 10083) are printed
- Enter a starting number for the Remittance Advices in this field (the numbering will begin with the next value)
- For example: REMIT00001
- Transfer FastTab
- Transit No. (the bank’s routing number)
- Bank Account No.
- Bank Branch No. (the bank can provide this)
- Export Format (select US unless dealing with the Royal Bank of Canada (CA) or a Mexico format (MX))
- E-Pay Export File Path: populate with the network location of a folder that the user processing the Payment Journal batches has security access to read/write/delete files.
- This value entered in this field MUST end in
- NAV temporarily places the Electronic Payment file in this folder when the Payment Journal, Export function is run
- Network security issues to this folder are the #1 cause of support calls on Electronic Payments.
- Last E-Pay Export File Name: Enter a name for the file with a numeric value as the last digits to the right and the appropriate file extension. For example, if the bank requires files in *.txt format, you could enter: ACH0001.txt
- E-Pay Trans. Program Path: Populate with the network location of a folder that the user processing the Payment Journal batches has security access to read/write/delete files.
- This value entered in this field MUST end in
- When the user selects Transmit in the Payment Journal, NAV moves the Electronic Payment file OUT of the folder identified in the ‘E-Pay Export File Path’ field and INTO this folder.
- This is where the user will go to in order to pick up the file and send it to the bank
- Note that this field was removed from the Bank Account Card at some point, but it MUST be populated.
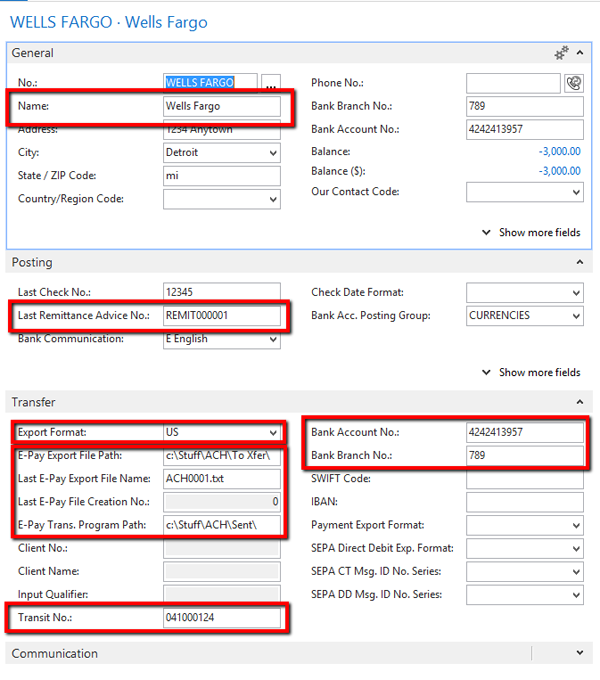
Figure 2 – Bank Account Card.
Vendor and Vendor Bank Account:
On the Vendor Card, you will need to identify a field to segregate vendors that use ACH as their method of payment from vendors that accept checks. This is typically done by using the Payment Method Field.
Each vendor to be paid via electronic payment must have a Vendor Bank Account Card set up with ‘Use for Electronic Payments’ selected.
- The only required fields are:
- Code
- Name
- Bank Branch No.
- Bank Account No.
- Transit No.
- Use for Electronic Payments
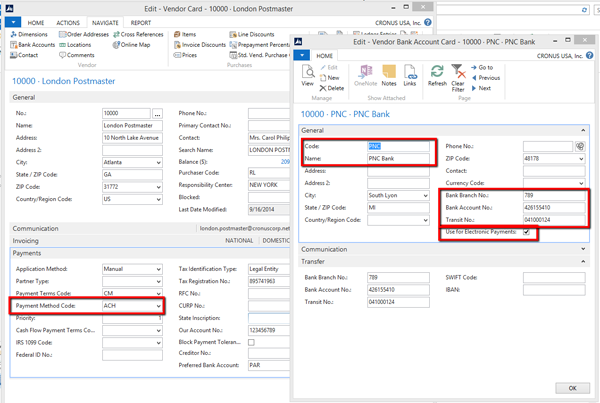
Figure 3 – Vendor Card and Bank and Account Card with Required Fields Highlighted for Electronic Payment.
After performing these setups, you can then begin using NAV to create files for electronic Payments. A Future blog will cover the steps necessary to process Bank EFTs (electronic fund transfers) using Payment Journals.
The use of electronic payments can save time and money. This process provides better visibility into your payments and speeds up the processing of payments to your suppliers. For further information on how the electronic payment tools can benefit your organization, please feel free to contact the Experts in Microsoft Dynamics NAV at Archerpoint.
For more resources and tips related to Microsoft Dynamics NAV, read our expert team members’ blogs.
Read more “How To” blogs for practical advice on using Microsoft Dynamics NAV.
Trending Posts
- Login Error: Communication protocol mismatch between client and server
- How to Make Measures Total Correctly in Power BI Tables
- The Microsoft Technology Stack – What Is It & Why Should You Care?
- MRP vs. MPS: Choosing the Right Planning Approach for Your Manufacturing Business
- Guide to How Manufacturers Can Implement Quality Control Systems Using Business Central
Stay Informed
Subscribe to Communications
"*required" indicates required fields