Microsoft Business Central File Handling Part 4

This series of blogs discusses handling files in Microsoft Dynamics Business Central online, which our team learned at this year’s Microsoft Directions Asia Conference. In Part 1, we explained how to export a file to Excel and download it. Part 2 explained how to upload a file and store it in a table. Part 3 explained how to update an existing Excel file. In our final blog, we discuss how to email an exported file from Microsoft Dynamics Business Central online.
Emailing an Exported File from Microsoft Dynamics Business Central Online
Another very common scenario is to email a file instead of downloading it to the user. To run this scenario, you need to set up SMTP in your Dynamics Business Central database. This exercise assumes that the SMTP settings are ready.
The overall process is quite simple and can be used for other scenarios as well. The Excel Buffer table has a function to save the output file to a stream instead of downloading it to the user. When we have the data in the stream, we can do anything with it, like storing it in table, uploading it to a webservice, or emailing it.
Prerequisites:
- Dynamics 365 Business Central Sandbox Environment.
- Dynamics 365 Business Central should run from Azure Cloud
- Visual Studio Code
This task includes the following steps:
- Add a function to save the output of the Excel Buffer to the TempBlob table
- Add a function to email the content of the TempBlob table
You can apply this to both export to Excel codeunits.
Save the Output of the Excel Buffer to a Stream Variable
Create a new codeunit and set the table no. to table Sales Header.
- Add a function ExportExcelFileToBlob that stores the output in a TempBlob variableFigure 1 – Adding a function ExportExcelFileToBlob that stores the output in a TempBlob variable in Microsoft Dynamics Business Central online
Email the Content of the TempBlob Table
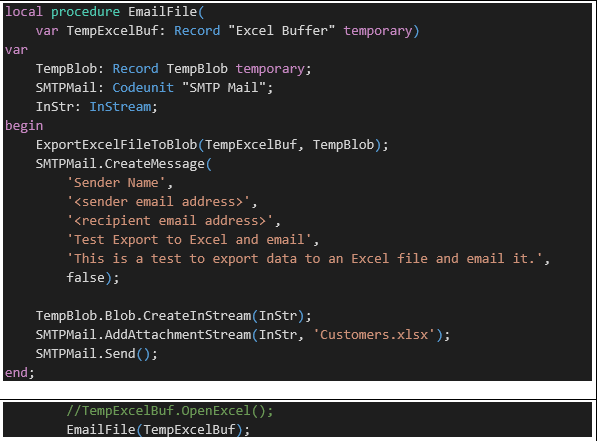
- Create a function EmailFile
- Create variables for TempBlob record SMTP Mail codeunit InStream.
- Call the ExportExcelFileToBlob function that we create in the previous step.
- Call the CreateMessage function of the SMTP Mail codeunit. Make sure to provide a valid sender and recipient email address.
- Add the content of the TempBlob table as an attachment to the email.
- Send the email.
- In the Export2Excel function, replace the line to open the Excel file with a call to the function EmailFile.
- Publish the app and test it. Don’t forget to set the SMTP settings first!
Figure 2 – Emailing the content of the TempBlob Table in Microsoft Dynamics Business Central online
If you have any Dynamics NAV or Business Central questions for any version, contact ArcherPoint.
Read more “How To” blogs from ArcherPoint for practical advice on using Microsoft Dynamics Business Central or NAV.
If you are interested in NAV/Business Central development, check out our collection of NAV/BC Development Blogs.

