Microsoft Dynamics NAV: Creating a Revenue Account Schedule

In another blog post, we demonstrate how to create a Revenue Finance Performance chart using the Cronus demo data in Microsoft Dynamics NAV. However, to create the chart, you need to have an existing Account Schedule from which to pull data. This blog post will demonstrate how the Cronus Revenue account schedule was set up so you can create your own revenue account schedule using your own G/L accounts.
NOTE: The scope of this blog is strictly for the Revenue account schedule that was used in the Finance Performance Chart blog. There is much more to Account Schedules in Microsoft Dynamics NAV that will not be covered here, so please contact ArcherPoint if you have other questions about Account Schedules.
Pull up the Account Schedules and click New.
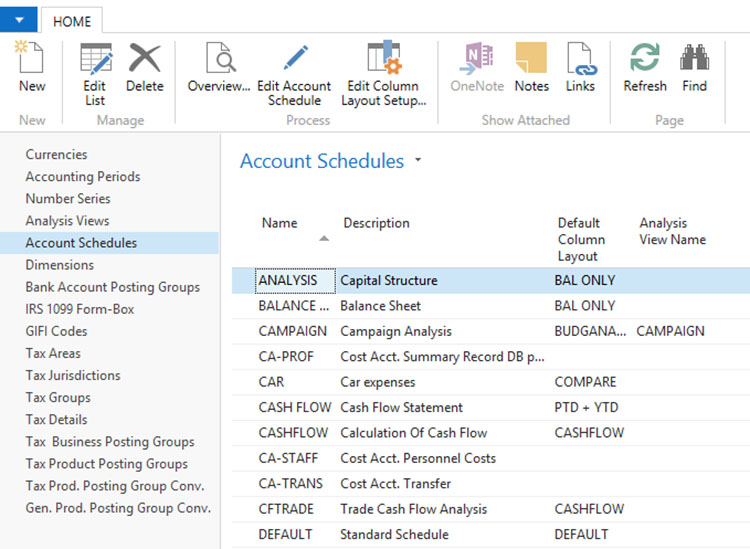
Figure 1 – Account Schedules
Type in the Name and Description of the Account Schedule. In this case, Cronus named it Revenue. If desired, you can fill in a Default Column Layout and Analysis View. The Column Layout and Analysis View are separate setups that would need to be done as well. Then Click Edit Account Schedule.
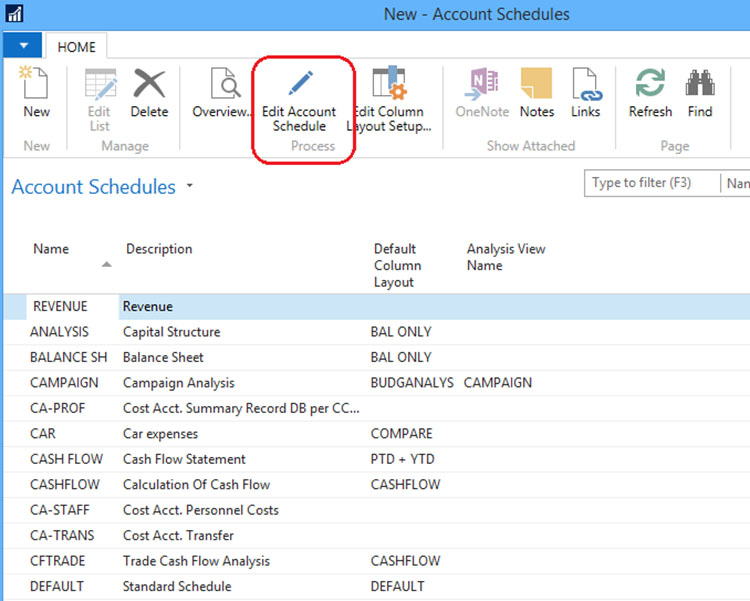
Figure 2 – Name Account Schedule and click Edit Account Schedule
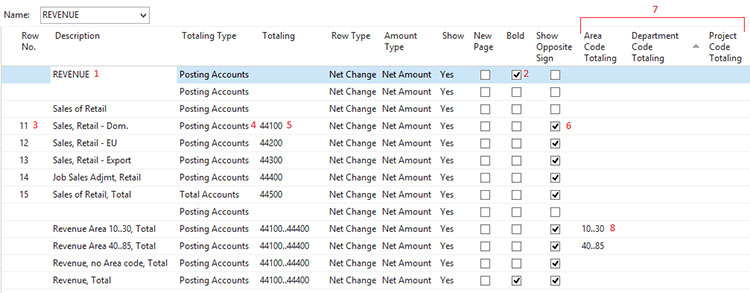
From the Edit Account Schedule screen, you can determine what you want your account schedule to consist of. Below, we will show the relevance of the different fields for our Revenue Account Schedule.
Figure 3 – Edit Account Schedule screen
Description: This column of fields is, as you would guess, just a description. In this particular case, the Revenue description is being used as a title should you run any reports off of this account schedule.
Bold: This field allows you to bold any descriptions on the Account Schedule should you run a report off of it.
Row No: This field is not required but can be filled in order to use those rows for formulas. In this particular account schedule example, although the row numbers are filled in, they are not being used in a formula in the account schedule but are available for future use.
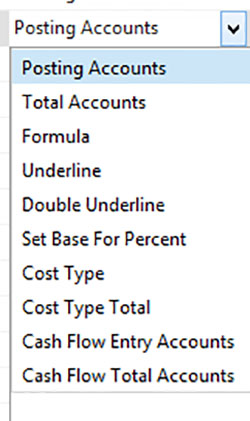
Totaling Type: This column determines the type of field the next column (Totaling) is. Posting Accounts populates by default and is sufficient for this account schedule example as our data is being pulled off of the G/L accounts. Other options include Total Accounts, Formula, Cost Type, etc. See Figure 4 for all options.
Figure 4 – Totaling Type options
Totaling: This column is the information being used for our Finance Performance Chart. In this particular case, 44100 is the G/L account number for Sales, Retail – Dom in the Cronus chart of accounts.
Show Opposite Sign: This allows the information to display in opposite sign. In NAV, debit amounts are displayed as positive numbers and credit amounts displayed as negative. Sales are posted as credit amounts, so they would display as negative numbers, which would make our Revenue Chart look weird. Show Opposite Sign is checked so on our chart they will display as positive numbers.
Analysis View: These three columns are Dimensions. The labels of these columns are determined by the setup on the Analysis View. We will not go into detail about the Analysis view as it is beyond the scope of this blog. Refer to Figure 5 to see where the Dimensions were determined. Up to 4 Dimensions can be set up.
Figure 5 – Analysis view
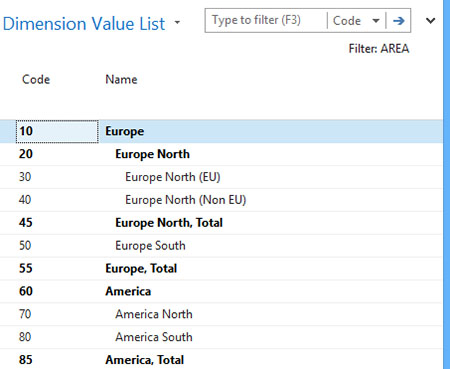
Area Code Totaling (Dimension 1 Code): As mentioned above, this field is dependent on what Dimension was set up. In this case, the Revenue account schedule is using this field to filter on the Area dimension codes. See Figure 6 for the Dimension Value List.
Figure 6 – Dimension Value List
That is the setup for our Revenue Account Schedule that was used by the Finance Performance Chart blog. Once you have this in place, you’re ready to set up your Finance Performance chart. If you have any questions, please contact ArcherPoint.
Do you have questions about other functionality in Dynamics NAV? Contact ArcherPoint; we’ll be happy to help you find the answers.
For more step-by-step instructions on how to perform specific tasks in Microsoft Dynamics NAV, see our collection of How-To blogs.
Trending Posts
Stay Informed
Choose Your Preferences
"*required" indicates required fields

