
Microsoft Dynamics NAV with a Flare Cumulative Updates Part 3 – The Technical Update

What do jeans craftily turned into bell-bottoms have in common with Microsoft Dynamics NAV? In this blog series, we’ve compared Microsoft Dynamics NAV to turning straight-legged jeans into bell bottoms. Why? Because the pieces of fabric inserted into the jean legs is a great analogy for how cumulative updates can make your NAV solution news and better and up to date with the latest technology. Part 1, What You Need to Know, reviews the basics of cumulative updates. Part 2, Planning, discusses how to plan for cumulative updates to avoid disruption. In this blog, we discuss the ins and outs of the technical update.
The Technical Update
As discussed in the first of this blog series, the cumulative update contains two parts: Application Objects (NAV code) and Executables (the code that runs the NAV product). Note that you do not have to install the executables update; you can just put in the application. But the reverse is not true! If you want to install the executables, you need to upgrade the application.
Who Can Perform an Update?
The executable update can be handled by a skilled database administrator, infrastructure, or technical person. This activity requires replacing files in both the client installs (yes, all of them) and the service tiers. While some knowledge of how to safely do this is required, it isn’t difficult to learn.
But when it comes to the application objects, a skilled developer who can not only write code, but also read and understand NAV and ISV code is required. A knowledge of the ISV code in your database, the version tags and documentation used, the object and field numbers used, and so on are vital to creating the correct code set from the application.
Consider that each object requiring a merge of code must be viewed with the changes being introduced and decisions must be made as to the proper placement of those changes. If you understand the object ranges, naming, and documentation methods of the customizations, it’s easy to understand what code is from an ISV product, what code is being replaced, and what brand-new code is being introduced to the database. (The last cumulative update I applied had over 228,000 of these code decisions just in tables). One line of code inserted in the wrong place can cause big trouble!
Lastly, the developer must have a NAV Application Developer license in order to extract the object in TXT form and apply the changes. There are different types of NAV developer licenses, so be sure you’re working with an Application Developer license.
Updating the Application Objects
When you receive the cumulative update download, the application folder will contain several files:
- TXT file: This is a text version of all objects being changed in this and prior cumulative updates for the NAV version.
- FOB file: This is the importable version of the changes in this and prior cumulative updates for the NAV version. If this is imported to your database, the Import Worksheet is used (that’s important).
- Changelog.txt: This is a before/after view of all changes made in this cumulative update.
- AccumulatedChangeLog.txt: This is an accumulated view of all changes made in this and prior cumulative updates for this version.
In a perfect world (do I hear angels singing?), the FOB file could just be imported, and voila! You’re updated. But that’s never the case. ISV products and custom code give us differences in the NAV code from database to database, so at some point, you’re going to have to manually merge some code. But – if you use the Import Worksheet to your advantage, you’ll know exactly which objects those are.
How to Begin
Trust me on this: Extract a set of your objects from all databases (if you’re not syncing objects – just development) as a TXT file. You’ll need it to refer to when the merge gets hairy, so store it in a very safe place…or two…or three.
Importing from the FOB file
In the development database you’re using, after code is synced across your databases and a code freeze has been declared, open the development client and begin to import the cumulative update FOB file. A message box will appear asking you to “Choose OK to open the Import Worksheet or Cancel to stop the import.” Click OK.
The import worksheet will display, and each object will have an ACTION assigned and possibly a Warning flag. See Figure 1.
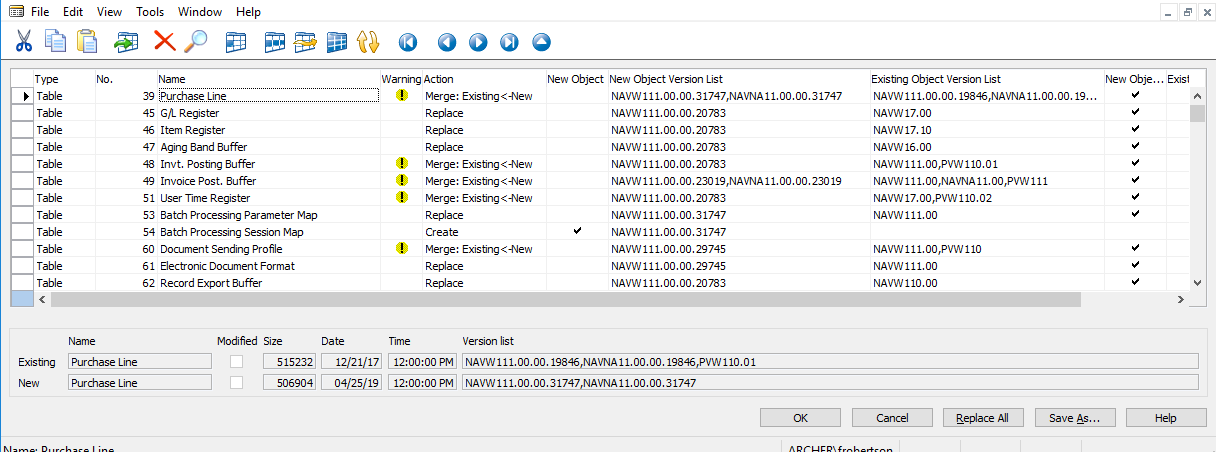
Figure 1 – The import worksheet in Microsoft Dynamics NAV with an action and, in some instances a warning flag, displayed.
There are 4 Actions/Warnings given, which can help you in getting the objects that do not need manual merge into your database:
- Create: Brand new objects
- Skip: The object was there before, and there are no changes
- Replace without Warning flag: The object exists, has changes in the cumulative update, but there are no custom version tags or ISV tags
- Replace with Warning flag: These are the objects that the worksheet knows to have changes and will require a manual merge
Disclaimer: The import worksheet only works if you are updating the version tag on objects as the NAV standards prescribe. If you’re throwing in changes to objects willy nilly and not updating the version tag, well, you just cost yourself the ability to use it properly. At this point, your only recourse is to code compare ALL objects. See you in a year or so when you climb out from under that rock!
Using the Import Worksheet
Once you have the import worksheet showing your action codes, you’re going to throw out a safety net for yourself. Export all lines in the worksheet to a spreadsheet. Then sort and separate them into pages in your spreadsheet by the categories. You should have FIVE pages: Create, Skip, Replace without Warning, Replace with Warning, and ALL Objects. Get a count from the first four pages, and make sure it matches the total object count.
You’ll use these pages as you import objects and as you create sets of objects to manually merge.
Filter the Worksheet
- Using the Import Worksheet column filter, first filter for only the CREATE objects, and import those objects to your database. An object count will be given at the end, which should match the object count on your spreadsheet of CREATE objects.
- You can literally skip the SKIP category because nothing has changed.
- Filter for the action REPLACE with the Warning flag FALSE. This will list all the objects that have cumulative updates only – no ISV or customizations. Import these objects, and again check the import count to your spreadsheet.
Hopefully, that exercise gave you most of your objects from the cumulative update. Any in the Replace with Warning group will need to be manually merged.
Setting Up the Manual Merge
Don’t try to eat the elephant in one bite, or you and your code compare software may choke!
- First, divide your list of objects in the Replace with Warning worksheet into groups by object type (Table, Codeunit, Page, etc.). Then count them out into groups of 5-10 each. NOTE: I usually do the three big codeunits -12, 80 and 90 – individually. These can be intense merges.
- Go back to your development database and begin extracting out the object sets as you’ve separated them. I usually note on the worksheet, “Tables 1”, “Tables 2”, and so on. Mark the objects you want to extract, check that all that you marked are the correct objects, and then extract them to TXT. Do this with all your sets of objects and store them in a folder for all your cumulative update merge work files.
- Create a NAV Cronus database and import the entire set of cumulative update objects into it. Mark these by set as you did in the development database and follow the same procedures for checking that you have them all in each set, extracting to TXT files, and naming in a way that you know these are the new objects (“Table 1 from CU”, “Table 2 from CU”, etc.).
- Once these are extracted, go back to your worksheet and create a column on the far right that you’ll call something like STATUS. You just need a place to record where you are with each set. Let’s face it; you will have interruptions while merging. You need to know exactly where you left off. As you go through the process, you can update this column with “Merging”, “Merge Completed”, “Imported”, “Compile Issues”, “Resolved”, and finally, “DONE”.
From this point on, you do the heavy lifting. Manual merge is tedious and takes your full attention. Lock yourself in, turn off your phone, and get it done .
In the next blog in this series, we’ll talk about regression testing and development. Contact ArcherPoint with your questions or needs around planning for your next cumulative update.
Trending Posts
- Login Error: Communication protocol mismatch between client and server
- How to Make Measures Total Correctly in Power BI Tables
- The Microsoft Technology Stack – What Is It & Why Should You Care?
- MRP vs. MPS: Choosing the Right Planning Approach for Your Manufacturing Business
- Guide to How Manufacturers Can Implement Quality Control Systems Using Business Central
Stay Informed
Subscribe to Communications
"*required" indicates required fields