
How to Cycle Count in Microsoft Dynamics NAV, Part 1

This blog walks through the concepts of cycle counting and how to use Microsoft Dynamics NAV to perform cycle counts using the ABC Classification method. Part 2 of this blog series will discuss how to use the physical location method of cycle counting. First, let’s discuss the concepts and philosophy behind cycle counting.
The concepts and philosophy behind cycle counting
Let’s begin by discussing what cycle counting is not: It is NOT a tool to count your way to inventory accuracy. Inventory accuracy is the result of sound inventory processes and procedures. If you have poor processes and procedures, you will always have inaccurate inventory no matter how many times you count it. The real purpose of a good cycle count program is to identify your poor inventory practices so that they can be corrected. Continuously improving inventory practices will lead to continuously more accurate inventory. All warehouse people understand that it is easier to count and reconcile accurate inventory than it is to count inaccurate inventory.
There are two schools of thought when discussing how to perform cycle counting:
- Count by ABC classifications: This method breaks items into categories of importance and count the more important items more frequently.
- Count by location in the warehouse: This method breaks the warehouse into sections, and the counting moves from section to section, and then starts over at the first section again.
Of course, there can be variations to this logic where the warehouse sections have been broken into categories and the A sections counted more frequently than the B and C sections. NAV can easily work with the first two methods of cycle counting. More advanced cycle counting could be done, but the assigning and tracking would need to be done outside of NAV.
This blog discusses how to cycle count in NAV using the ABC Classification method.
ABC Classification
The ABC Classification method breaks your inventory into three groups based on importance. This method is based on the 80/20 rule, assumes that 20% of your items make up the most important items and that a vast majority of your items are not as important. The items are assigned a classification based on the following percentages:
- A = Top 20%
- B = Next 30%
- C = Last 50%
Note that these are general rules and guidelines. The number of categories and the percentage breakdown are business rules that should be set up by each company. The example above is considered typical ABC classification guideline.
The first decision when using category codes is to decide what method you will use to classify your items for counting. There are generally three options that are considered:
- Item Value
- Item Usage
- Frequency of usage
Each of these methods is discussed below:
Item Value:
The item value method bases the importance rating on the value of the item. When using this method, the items are listed in order from the most expensive (per piece) to the least expensive. The top 20% are assigned to the A classification. The B items are the next 30%, with the balance being assigned to the C classification.
Item Usage (Value):
The Item Usage classification is assigned based on the usage of the item during the year. When using this method, the item’s usage is calculated (consumption and shipment) by multiplying the quantity used by the item’s cost. The usage for each item is combined to determine the annual usage for the year.
Finally, each item’s usage is divided by the annual total usage to determine the percent usage for each item for the year. The groups are then assigned a classification based on where they fit in the listing of the highest to lowest usage items.
Similar to Item Value, the ABC classification is assigned using the 20/30/50 percent rule.
Frequency of Use:
The Frequency of Use method assigns importance based on how often an item is used. This is not to be confused with volume of usage; it is how often the item is transacted regardless of volume. Let’s look at an example to make sure this method is clearly understood.
Let’s assume we have two items. During the year, item A had two orders that required 500 pieces each. Item B was on 50 orders, but the total used during the year was only 100 pieces. The frequency of use rule says item B is more important than A because it is used more frequently than A.
To classify items using this method, the “Outbound” transactions need to be counted for each item, and then the items would be listed from most frequently to least frequently transacted items.
The items would then be assigned the ABC classification using the 20/30/50 percent rule.
Setup in NAV
Once the item has been assigned an ABC classification, this classification can be used to assign a count frequency to it. The count frequency rules are an internal business decision, but typically the rules are something like:
- A Items – Count Monthly
- B Items – Count Quarterly
- C Items – Count Annually
The count frequency is assigned on the Item Card (or Stock Keeping Unit Card, but that is a subject of a future blog) in NAV. This value is assigned in the “Phys. Invt. Counting Period Code” field. This field is on the Warehouse tab of the Item Card.
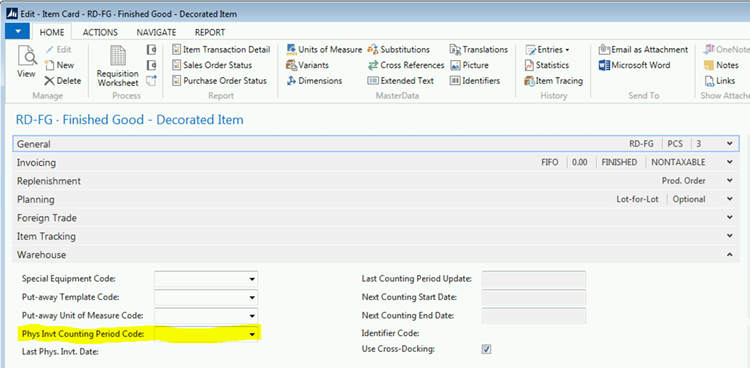
Figure 1. Item Card with “Phys. Invt. Counting Period Code” field highlighted.
NAV lets you make up your own business rules based on how often you want to count each classification. You can name your count periods anything you want. You can call them “A”, “B”, “C”, or “Fast”, “Medium”, “Slow”. The name of the code can be anything you would like it to be. In addition, there is no limit to the number of classifications you create. The classic cycle count logic assumes three classifications, but NAV allows you to create as many count frequencies as you would like to manage.
Below is an example of how to set up the Count Frequency options.
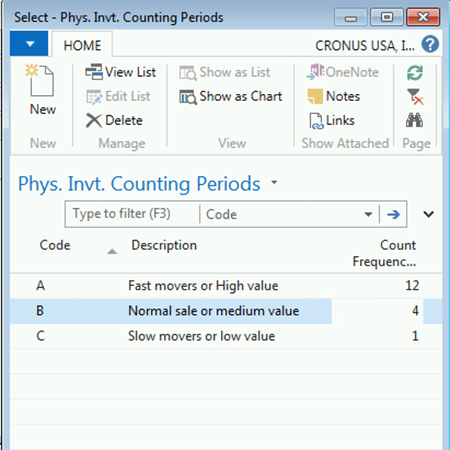
Figure 2. Setting the Phy. Invt. Counting Period Code
In this example, A items will be counted monthly. B items will be counted quarterly, and C items will be counted once a year. Once an item’s classification has been determined, the count frequency code for that item should be assigned on the item card.
NAV assigns the Next Count Starting and Ending dates when the Phy. Invt. Counting Period Code is set. NAV sets the dates based on the count frequency associated with the code that has been assigned.
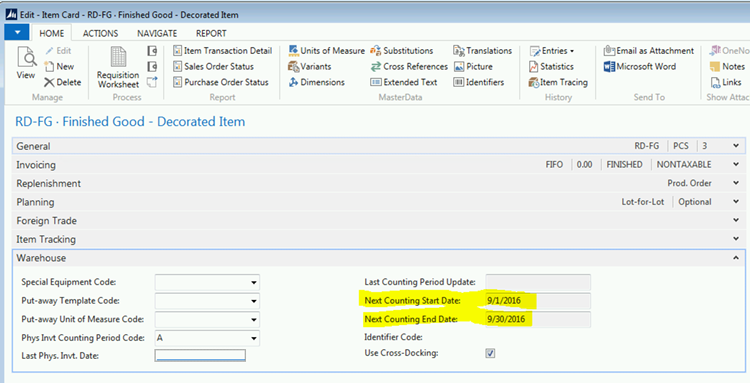
Figure 3. Item Card with Next Count Starting and Ending Dates fields highlighted.
Now that the next count date range has been assigned, this item will show as an item to count the next time the Cycle Count Selection process is run.
Selecting Parts to Count
- NAV uses the Physical Inventory Journal to generate cycle counts. Open the Physical Inventory Journal and select the Calculate Count Period function on the Action tab.
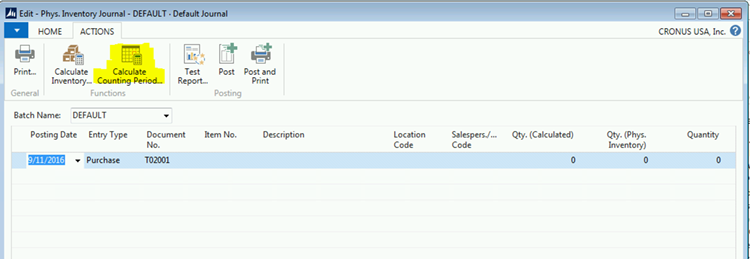
Figure 4. Phys. Inventory Journal with Calculate Count Period function highlighted on the Action tab.
- Once this option has been selected, NAV will display a page with all the items that need to be counted.
- Select the items you want to include in this count and click the OK button at the bottom of the page.
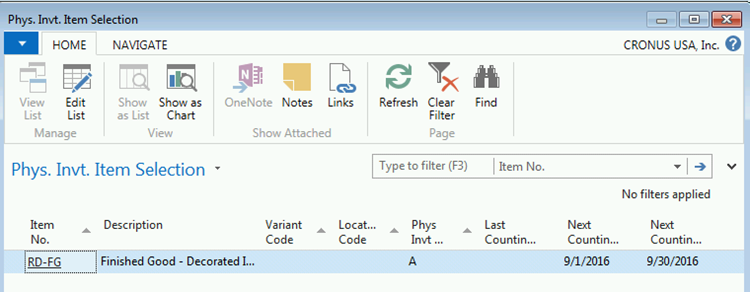
Figure 5. Selecting items to include in the count.
- This will populate the physical inventory journal with the items that need to be counted.
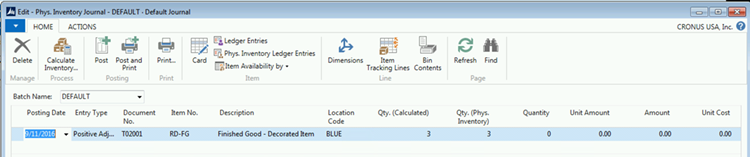
Figure 6. Physical Inventory Journal with items to be counted.
- Print the count list by clicking on the Print icon on the ribbon.
- A sample of the print is shown below.
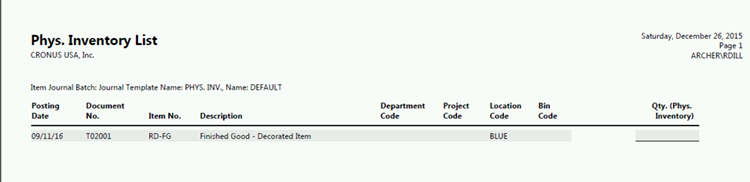
Figure 7. Printed count list.
- Once the item has been counted, record the count in the “Qty. (Phy. Inventory)” column as shown below.

Figure 8. Recording the count in the “Qty. (Phy. Inventory)” column.
- NAV calculates the difference between the Quantity Counted and the Quantity on Hand, and populates the “Quantity” field.
- When this is posted, NAV will adjust the inventory, record the date of the count, and set the next count date range. The screen shot below shows an example of the item after it was posted.
`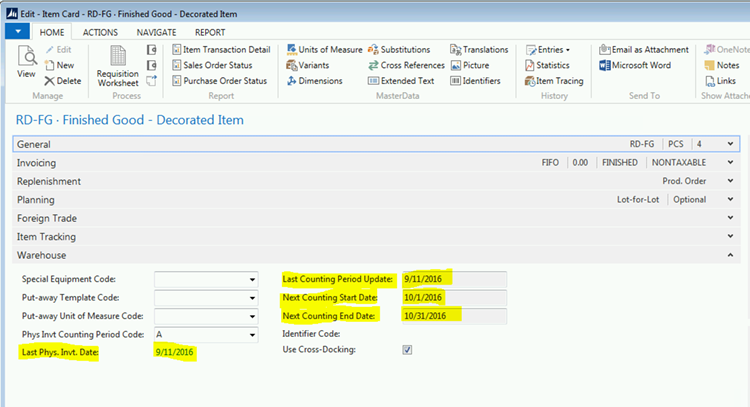
Figure 9. Example of an item after posting.
- Note the new dates on the item card record:
- Last Phy. Invt. Date field = the date the item was counted.
- Last Counting Period Update field = the date that the Next Counting period was set. This will usually be the last count date, unless the count frequency has been changed.
- Next Counting Start Date field = Start date of the period that this item needs to be counted next.
- Next Counting End Date field = Ending date of the period that this item needs to be counted next.
Remember that the most important part of the cycle count process is to identify why the error exists. Any error should be researched to find out why the error existed. Once the reason is known, you can track the cause of the error and record it in the Reason Code field on the journal line. This will allow you to track the most frequent errors and make procedural changes that will eliminate these errors.
If you have any questions about this blog, contact ArcherPoint. Stay tuned for Part 2 of this series next week.
Related to this topic:
How to Cycle Count in Microsoft Dynamics NAV, Part 2
Setting Up Cycle Counting with Warehouse Management in Dynamics NAV
For step-by-step instructions on how to perform specific tasks in Microsoft Dynamics NAV, see our collection of How-To blogs.
Trending Posts
- Login Error: Communication protocol mismatch between client and server
- How to Make Measures Total Correctly in Power BI Tables
- The Microsoft Technology Stack – What Is It & Why Should You Care?
- MRP vs. MPS: Choosing the Right Planning Approach for Your Manufacturing Business
- Guide to How Manufacturers Can Implement Quality Control Systems Using Business Central
Stay Informed
Subscribe to Communications
"*required" indicates required fields